


4
Setting up your hard drive enclosureDX-HD302513
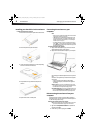
Installing your hard drive in the enclosure
To install your hard drive in the enclosure:
1 Remove the two screws from the panel with the USB connector.
2 Remove the plastic end cap and circuit board.
3 Connect your hard drive’s SATA connector to the corresponding
connector on the enclosure circuit board.
4 Gently slide the drive tray, with drive attached, into the
enclosure.
5 Replace the two screws on the side panel.
Connecting the enclosure to your
computer
Notes:
• Make sure you have installed the hard drive into the enclosure before
connecting the enclosure to your computer.
•A new hard drive must be initialized and partitioned before it will
appear in Windows Explorer or on your Mac desktop. Refer to your
hard drive manufacturer’s documentation, or see “Formatting the
hard drive on your PC” on page 5.
• For optimal performance, make sure your laptop or PC has USB 3.0
ports ( ). If your computer does not have USB 3.0 capability,
you can plug the USB 3.0 cable into any available USB 2.0 port, but it
will only run at USB 2.0 speeds.
To connect the enclosure to your computer:
1 Plug the smaller USB 3.0 (Micro-B type) connector on the USB
cable (provided) into the port on the enclosure.
2 Plug the other end of the cable into USB port on your computer.
The operating system automatically detects and sets up the new
drive.
If the drive is correctly detected, a new drive letter is assigned to
the enclosure.
• For PCs, the new drive letter appears in My Computer.
• For Macintosh computers, the new drive letter appears on
the desktop.
Note for PC users: If you do not see an additional drive in your system,
you might need to format the new drive. See the following section for
more information on detecting and formatting your drive.
Notes for Macintosh users: If you do not see an additional drive in your
system, select Disk Utilities from the Utilities folder, then select the
external enclosure and format the drive to meet your requirements.
Disconnecting the enclosure from your
computer
You can disconnect the enclosure at any time while the computer is
turned off. If, however, you want to disconnect it while the computer is
on, make sure that you do it correctly.
To disconnect the enclosure while your PC is running:
Note: If a drive window is open or the hard drive enclosure is active, close
any associated windows before trying to remove the enclosure.
1 Right-click the Safely Remove Hardware icon (located near
the clock on the taskbar).
2 Click the drive you want to unplug, then click STOP.
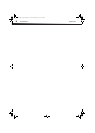
2.5” SATA hard drive
USB 3.0 A type male connector
USB 3.0 Micro B type male connector
DX-HD302513_12-0295_MAN_ENG_V1.fm Page 4 Monday, June 18, 2012 12:46 PM