


Installation16
Make sure to connect the transmission leads of your Diva Server T1/PRI adapter
to the receiving connectors of the network termination and the receiving leads of
your Diva Server T1/PRI adapter to the transmission connectors of the network
termination.
Note: If the adapter is not properly connected to the ISDN PRI or T1 line, a layer 1
warning light appears on the NT, the adapter, the external CSU, and at the
switching center of the network provider. The network provider might then
deactivate the line. If this occurs, you must contact your network provider to
re-enable your line.
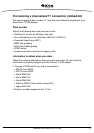
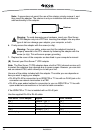
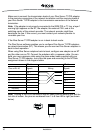
If the Diva Server T1/PRI adapter is run in back-to-back mode:
The Diva Server software enables you to configure Diva Server T1/PRI adapters
as network termination (NT). This means you can use two Diva Server adapters in
back-to-back operation.
When using Diva Server adapters back-to-back, configure one adapter as an NT
and the other one as TE. Connect the adapters with a crossover cable. You can
build your own crossover cable using the open-ended cable supplied with your
Diva Server T1/PRI adapter. Just crimp the open end according to the NT-Side
assignment shown in the diagram below:
Note: Looking at the RJ-45 connector with the cable running towards you and the
lock tab at bottom, the pins are numbered from 1 to 8 from left to right (as shown
below).
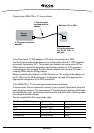
TE side NT side
Pins on RJ-45 Signals
Wiring
Signals
1 RX + RX +
2RX - RX -
3 not used
4TX + TX +
5TX - TX -
6 not used
7 not used
8 not used
1
8
1
8