


15
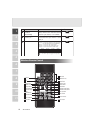
Connection to Monitor and Projector
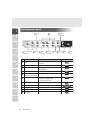
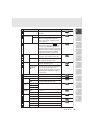
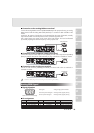
The following settings of this product can be switched with the DIP switch. Switch the settings
according to the connection environment. The factory settings are as shown in the following
table:
In the area where the rated supply frequency is 50Hz, when the D key is used as set at “0,”
fluorescent lamps, mercury lamps and other AC lamps may suffer “flicker” due to the lighting
of their discharge tubes. In this case, set the D key to “1,” and the flicker may be reduced. In
the area where the rated supply frequency is 60Hz, use the D key as factory set at “0.”
Be sure to turn off the power supply to all equipment before making any connections to
protect this product and all the connected equipment.
When switching the DIP switch key, be sure to turn off the power supply beforehand.
When plugging/unplugging cables, be sure to do so by holding the plugs.
4 SETTING UP AND CONNECTION
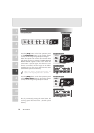
Key
A
B
To switch the resolution of images output from RGB terminals
To switch the VIDEO output system
Function Key selection
Initial setting
SXGA
NTSC
0
0
Over scan
0
Content
C
D
To switch the screen size of VIDEO output
To switch the electronic shutter mode
60
0
1
2
3
4
5
6
7
8
9
10
11
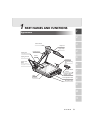
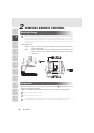
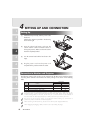
Setting Up
(1) Unfold the lamp arms fully until they come to the
dead end.
Unfold in the sequence specified in the drawing
shown to the right.
(2) Press the column lock button, and raise the
column until the column lock button returns to
the original position. Make sure that the column
has been completely locked.
(3) Turn the camera head until the lens faces to the
stage.
(4) Plug the power cord into the power cord
receptacle of this product and the AC outlet.
1
2
3
4
5