


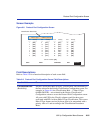
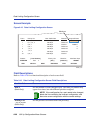


Rate Limiting Configuration Screen
9-40 802.1p Configuration Menu Screens
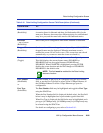
Priority List
– bottom of screen
(Selectable)
Assign one or more priorities to the port being configured. The settings
available are 0, 1, 2, 3, 4, 5, 6, 7, or ALL. When the Priority List is
highlighted, the SPACE bar is used to step to the priority, which must
be marked with an asterisk (*) using the M key. More than one priority
may be selected and marked for each port.
NOTE: If there are two entries for Inbound traffic with the
same Port number (for example, Port 2 and Port 2), you
cannot assign the same priority to both Port Inbound entries.
This also holds true for two entries for Outbound traffic on the
same port.
The selected priorities can be cleared by stepping to each one and
pressing the M key.
For details on configuring a port, refer to Section 9.8.1.
Direction
– bottom of screen
(Toggle)
Toggle between Inbound and Outbound rate limiting. Inbound is the
default value. Up to four rate limit rules (entries) may be set per port,
two for Inbound and two for Outbound or any combination of the four
Inbound or Outbound. Inbound refers to traffic being received by the
switch module and Outbound refers to traffic leaving the switch
module.
Inbound configures the rate limit to drop frames when the traffic rate
(kbps) received by the switch port exceeds the setting in the Max Rate:
kbps field for a particular entry. If there are two or three priority port
entries set to Inbound, each entry functions independently. So, if the
Max Rate is exceeded in one entry, the frames in that entry are
dropped. However, if the traffic associated with another entry on the
same port is transmitting within its maximum rate setting, those frames
are not affected.
Outbound functions the same as the Inbound, except that the port is
configured to drop frames when the traffic rate (kbps) out of the port
exceeds the setting in the Max Rate: kbps field for a particular entry.
Table 9-10 Rate Limiting Configuration Screen Field Descriptions (Continued)
Use this field… To…