


Using the Slide Scanner
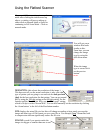
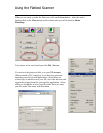
2. The picture may now be scanned, click Scan button. NOTE: scanning may take a
minute. If the scanner cut off part of the image, please ask a TLC employee for
assistance.
3. When it is finished scanning, close the scan window by clicking on the Close button.
You should see the original screen with your new picture on it.
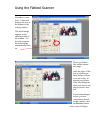
4. From the menu bar, click File \ Save As.
Name your file in the File name box.
You have the option of saving the file as a few different types; they are as follows:
• JPEG or JPG: This format compresses the image, with some data loss
depending on the degree of the compression. This is the best format for
scanned photographs used on web sites or for sending photographic
images in email.
• GIF: This format is used mainly for computer-generated graphics such as
buttons and bars and clip art style images. It works well for text and
graphics with straight lines, but is limited to 256 colors and poorly suited
for photographic purposes.
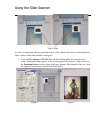
You can save the picture to disk, or to your NT account. (Please consult a TTC advisor if
you have any questions regarding your file size and applications.) Since there are several
ways in which to save your file, one of the advisors can suggest the proper format for your
specific application. Select where you would like to save your file under 'Save in:,' name
your file under 'File name;' and click Save.
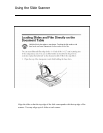
After you have saved your file be sure remove your slide from the scanner. If you would like
to scan another slide, repeat steps 4 – 11.
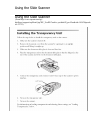
Finishing up
1. When you have finished scanning slides, click on File / Exit.
2. Don't forget to take your slides out of the scanner, and to sign out on your way out of the
center.