


6-9
Maintaining and Transporting the Printer | 6-9
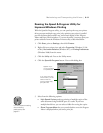
Aligning the Print Head from the Control Panel
1. Turn off the printer, if necessary.
2. Hold down both the
Reset
and
Eject/Continue
buttons
while you press and hold the
P
Operate
button to turn
on the printer. Release all three buttons when the
P Operate
light starts flashing.
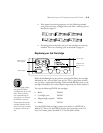
The printer enters print head alignment mode and three
patterns, similar to the ones on the right, are printed:
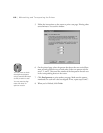
3. Check the printout and select the numbered pattern,
from #1 to #3, that is misaligned. (If more than one
pattern is misaligned, select the most misaligned one.)
For example, pattern #2 here is the most misaligned.
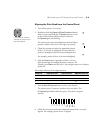
4. Press the
Reset
button repeatedly until the
H
ink out
light representing the misaligned pattern comes on. For
example, press
Reset
until the cyan
H
ink out light comes on to indicate
pattern #2.
5. Press the
Eject/Continue
button to enter your selection.
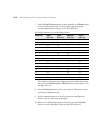
The printer prints 15 patterns, similar to the ones below. The
P Operate
light flashes while they print. This takes a couple of
minutes.
6. Check the printout and select the numbered pattern that is correctly
aligned. For example, pattern 8 here is aligned.
Note
It may take up to seven
minutes for the printer to
print the patterns.
Ink out light indicators for misaligned pattern
Pattern # Black
H
HH
H
ink out
Cyan
H
HH
H
ink out
Magenta
H
HH
H
ink out
1On ——
2 — On —
3 ——On