


Cartridge Installation
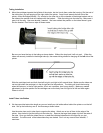
4. Check the CFS cartridge, there should be 4 Velcro strips on each cartridge. You may have to guide these
pads into the cartridge holder, it is a tight fit. Push the cartridge all the way down, so printer posts puncture
the seals on the bottom of the cartridge. Make sure they are down all the way and are making contact with
the fingers that read the chip. If they are not seated all the way down, the chip may make partial contact
causing electrical damage to the chip. Both the color and black cartridges should now be firmly in place.
Keep the cartridges in the approximate center of the printer and let the tubing extend out the right side of the
printer.
Bridge Bracket Installation
5. The cartridge holder should move freely from side to side, power is off. Use some alcohol and a paper towel
and clean the top front edge of the printer and the bottom inside edge. This is where the Bridge Bracket will
attach with foam tape.
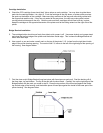
6. Use a pencil or pen and make a small mark on the top of the printer 2 1/2 inches from the right hand inside
edge of the printer housing opening. The mark will be 2 ½ inches to the left of the right edge of the opening of
the housing. See diagram below.
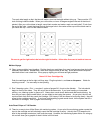
7. Find the clear acrylic Bridge Bracket (long bent piece with foam tape on each end). Peel the backing off of
the foam tape, top and bottom. The top is the part with the short bend. Carefully line up the right edge of the
Bridge Bracket with the mark you made in step 6. Press the top portion of the foam tape against the inside
top vertical edge of the housing, and the bottom piece of foam tape against the inside of the lower part of the
printer housing. See diagram below.