


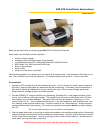

Tubing Installation
8. Move the cartridges towards the left side of the printer, but don’t push them under the housing. Get the end of
the tubing that you left hanging off the right side of the printer. Loop it back towards the left side of the
printer, under the Bridge Bracket. Put alcohol on the tube clip on the underside of the bridge bracket and on
the tubes at the position that will interface with the bracket. Slide the tubing into the tube clip. Make sure it
goes in all the way. Use more alcohol if needed. We have marked the position on the tubes where it goes
into the bracket. Don’t lose or wipe off these marks.
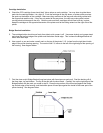
Be sure you have the loop in the tubing as shown below. Without the loop back it will not work. When the
tubes are securely installed in the bridge tube clip, the excess tubing should be hanging off the left side of the
printer.
Slide the cartridges back and forth from left to right, and right to left, several times. Make sure the tubes are
not too tight when the cartridge is in the far right and far left positions. The tubing will touch the housing
when the carts are in the far right position, this is not a problem, don’t worry about it. Make any needed
adjustment in the tube position so the cartridges can move freely from full right to full left and back again.
Power is still off.
Install Tubes into Bottles
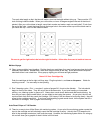
9. We have provided extra tube length so you can install your ink bottles either behind the printer or on the left
side. Set up the bottle tray one of the three ways shown below.
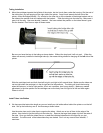
Use the extra clear acrylic tube clips to organize the tubes. Attach one or two of them to the edge of the
printer. Use alcohol to get the tubing into the tube clip. Remove the large black paper clip from the ends of
the tube. Once you have the tubes secure, un-web the individual tubes back to the tube clip you just
installed. Cut off the end of the tubes where they are dented. Don’t cut any more off than needed, 1”
maximum.