


PUB-119 Rev B.doc 19
Section 2 – Operation
2.1 Scanning
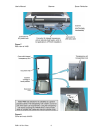
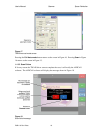
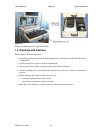
1. From the Add To Case screen, press the Scanner button.
2. On the V3 Cart, make sure the upper drawer is fully closed and the lower drawer is fully
extended.
3. Lift the scanner cover and place the original face down on the document table:
- the top of the image should be towards the back of the scanner (or the image can be
rotated later)
- the original should be aligned into the right rear corner of the document table
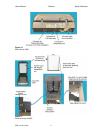
4. On the Scanner screen, select the type of scan:
- for a high-contrast, black and white image, push
Scan
- to retain color, shading, and details, push
Scan Color
5. Observe the TWAIN driver window as it goes through the following steps:
a. scanner warming up
b. preview
c. scan
6. When the scan is complete, the image will appear in the Scanner screen. If desired, push
the
Rotate button to rotate the image 90 degrees.
7. Scan additional images, if desired.
8. Click on the checkbox next to each thumbnail image to select or deselect it, and press
Save
to save the selected images into the case.
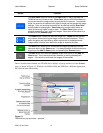
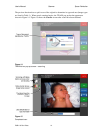
2.2 Restoring Automatic Mode
The following procedure specifically applies to the TWAIN 5 driver supplied with the Model
1640 and 1650 scanners.
In the event that a scan brings up the manual mode screen (see Figure 16), return to automatic
mode as follows:
1. Press the
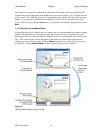
Full Auto mode button. This returns to the screen in Figure 15.
2. On the screen shown in Figure 15, ensure that the manual setting for resolution is
deactivated as follows:
a. Press the right arrow button
to expand the lower area of the screen, if necessary.
b. If the box by Specify Resolution for Full Auto Mode is checked, click on it to remove
the checkmark.