


EPSON Stylus C40UX
4/01 EPSON Stylus C40UX
- 5
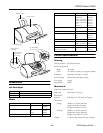
Testing the Printer
You can run a printer check to determine whether a problem
comes from the printer itself or some other source.
1. Make sure both the printer and computer are turned off.
Then disconnect the USB cable from the printer.
2. Make sure letter-size or larger paper is loaded in the printer.
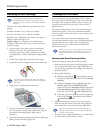
3. Hold down the
b maintenance button, then press and
release the
Ppower button. Continue holding down the
b maintenance button until the
P power light starts
to flash, then release it.
The printer prints one page showing its ROM version
number and a nozzle check pattern. (If the pattern has gaps
in its dots, you need to clean the print head; see page 6.)
4. Turn off the printer after it prints the check page. Then
reconnect the cable and turn on your printer and computer.
❏ If the check page prints, the problem probably lies in
your software settings, interface cable, or computer.
Your software may not be installed correctly.
❏ If the check page doesn’t print, you may have a problem
with your printer. Try the suggestions in the electronic
Reference Guide on the printer software CD-ROM. If
nothing works, contact your dealer or EPSON.
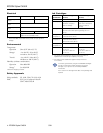
Printing on Special Media
Select the Media Type setting according to the guidelines in
the table below.
Additional Media Loading Guidelines
Don’t use the cleaning sheets that may be included with
your special media; they may damage the printer.
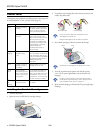
❏ Always load paper short edge first, even when printing
landscape-oriented pictures.
❏ Always handle sheets by the edges, and don’t touch the
printable surface.
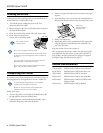
❏ Be sure to load the printable (whiter) side of the media face
up in the sheet feeder.
❏ You can load paper up to the tab on the right edge guide.
❏ In addition to the
Media
Type
setting, remember to select
the correct
Paper
Size
for your media in the printer
software.
❏ If the special media has protective sheets between each sheet
of media, be sure to remove the protective sheets before
printing.
❏ Some special media have a cut corner that you need to
position in the upper right corner when you load it.
❏ You can load the following number of sheets of EPSON
special media:
For this paper name...
Select this Media Type
setting
Plain paper and envelopes Plain paper
EPSON 360 dpi Ink Jet Paper
EPSON Iron-On Cool Peel Transfer Paper
360 dpi Ink Jet Paper
EPSON Photo Quality Ink Jet Paper
EPSON Photo Quality Ink Jet Cards
EPSON Photo Quality Self Adhesive
Sheets
Photo Quality Ink Jet Paper
EPSON Photo Paper
EPSON Glossy Photo Greeting Cards
Photo Paper
EPSON Photo Quality Glossy Film
EPSON Photo Stickers
Photo Quality Glossy Film
EPSON Ink Jet Transparencies Ink Jet Transparencies
EPSON Matte Paper - Heavyweight Matte Paper - Heavyweight
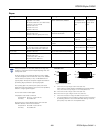
For this paper name...
Load this number of
sheets
EPSON 360 dpi Ink Jet Paper Up to 30 sheets
EPSON Photo Quality Ink Jet Paper Up to 30 sheets; 10
sheets for legal-size
EPSON Photo Quality Ink Jet Cards
EPSON Glossy Photo Greeting Cards
Up to 30 cards with the
included support sheet
beneath the stack
EPSON Photo Quality Glossy Film Up to 20 sheets (one
sheet at a time for
A6-size) with the
included support sheet
or a sheet of plain paper
beneath the stack
EPSON Photo Quality Self Adhesive Sheets
EPSON Iron-On Cool Peel Transfer Paper
EPSON Photo Stickers
EPSON Photo Paper (Panoramic size)
One sheet at a time
EPSON Ink Jet Transparencies Up to 10 sheets
EPSON Photo Paper (4 × 6-inch size) Up to 20 sheets with the
included support sheet
beneath the stack
EPSON Photo Paper (A4- and letter-size) One sheet at a time with
the included support
sheet beneath the sheet
Matte Paper - Heavyweight Up to 20 sheets with the
included support sheet
beneath the stack