


Projector Driver Application Note
Epson EMP-7800
Revision D
DR-EPS19 – 3/29/04 SP Controls reserves the right to modify specifications without notice at any time.
This document describes the SmartPanel Projector Driver for the Epson EMP-7800 projector. For more
information on configuring and using the Panel see the SmartPanel Configuration and Installation Guide.
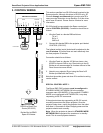
NOTE: For RS-232 control, the Epson EMP-7800 should be running projector firmware version 2.05 or
higher. For information on how to check your projector firmware version and instructions on how to
upgrade if necessary, see the Projector Firmware Note below.
NOTE: The Epson STANDBY MODE must be set to NETWORK ON in the projector ADVANCED1
onscreen menu or it may stop responding to RS-232 commands. See Special Control Note 1 in Section
II, Control Wiring below for more information. If you are unable to set STANDBY MODE to NETWORK
ON, an IR-only version (Revision C) of this projector driver is available. Contact SP Controls technical
support for more information.
NOTE: There are several additional projector configurations which are required for use of the Epson
projector with the SmartPanel. See Special Control Note 2 in Section II, Control Wiring below for more
information.
I. PROJECTOR CONTROL
A. Volume and Power Control
Volume control on the Epson is relative. Absolute volume control for the Epson is also possible with use
of SP Controls’ optional Audio Follow Video Pre-Amplifier.
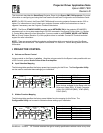
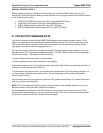
B. Input Selection Mapping
The following table specifies the factory-preset input mapping for this Driver. The Configuration Utility
can be used to customize these settings your installation.
Selection 1: VIDEO (RCA)
Selection 2: S-VIDEO
Selection 3: YPbPr (BNC)
Selection 4: COMPUTER (VGA)
Input choices available for the Epson with this
Driver are: Video (RCA), S-Video, Computer
(VGA), DVI, RGB-VID (BNC), YPbPr (BNC),
YCbCr (BNC).
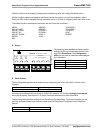
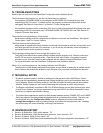
C. Hidden Function Mapping
The following table specifies the factory preset hidden function mapping for this Driver. The
Configuration Utility can be used to customize these settings your installation.
Selection 1: ESC
Selection 2: ENTER
Selection 3: ADJUST LEFT
Selection 4: ADJUST RIGHT
Off: MENU
Volume Up: ADJUST UP
Volume Down: ADJUST DOWN
Projector
Ready
Warm-up
OFF
ON
Volume
VIDEO (RCA)
S-VIDEO YPBPR (BNC) COMPUTER (VGA)
Projector
Ready
Warm-up
OFF
ON
Volume
ADJUST
UP
ADJUST
DOWN
MENU
ESC
ENTER
ADJUST
LEFT
ADJUST
RIGHT