


25
R4C477
short.bk Rev_C
A5 size SOFTW.FM
12/21/99 Pass 3
R
Proof Sign-off:
M.Otsuka, CRE Tsukada_______
N. Nomoto _______
_______
Using the Custom settings
The Custom settings let you make a wide range of changes with
a single click of the mouse. In the Custom settings list, you’ll find
ready-made settings provided by EPSON designed to match a
particular kind of printout, such as graphs and charts used in a
presentation, or images taken by a digital camera.
You can also create your own settings and add them to this list.
See “Using the Advanced settings” in the online
Reference Guide
for details.
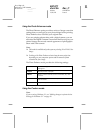
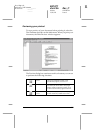
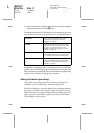
The Custom settings list includes the following ready-made
settings.
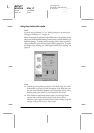
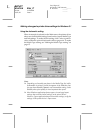
Follow the steps below to select a Custom setting.
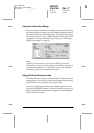
1. Click the
Advanced
button
on the Main menu.
2. From the Custom settings list, select the most appropriate
setting for the type of document or image you will print.
3. When you choose a Custom setting, other settings such as
Print Quality, Halftoning, and Color Adjustment are set
automatically. Changes are shown in the Current Settings
display at the bottom of the Main menu.
Text/Graph
Good for printing presentation
documents such as graphs and charts.
PhotoEnhance
Best for printing images captured using a
video or scanner or digital camera. This
setting automatically adjusts the
contrast, saturation, and brightness of the
original image data to produce sharper,
more vivid color printouts. PhotoEnhance
does not affect your original image data.
Note:
Printing with PhotoEnhance selected
may increase print time depending on
your computer system and the amount of
data contained in your image.
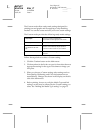
Economy
Good for printing drafts of text