• Evernote
• Microsoft OneNote
• Google Drive
• SugarSync
You see the Transfer Settings window.
6. Enter any required information to set up the destination. If you have previously created a saved
setting for the destination, select it from the drop-down list.
7. Adjust any save settings, then click OK, Send, or Print, depending on the destination.
Your originals are scanned and uploaded to the indicated server.
Parent topic: Scanning Special Projects
Scanning Multi-Page Originals as Separate Files - Windows
You can use Document Capture Pro (Windows only) to scan multi-page originals as separate scanned
files. You indicate where you want the new scanned files to start by inserting a blank page or barcode
between the pages of your original.
Note: The settings may vary, depending on the software version you are using. See the Help information
in Document Capture Pro for details.
1. Load a multi-page original with blank pages or barcodes inserted where you want to start a new
scanned file.
2. Do one of the following to start Document Capture Pro:
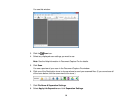
• Windows 8.x: Navigate to the Apps screen and select Document Capture Pro.
• Windows (other versions): Click or Start, and select All Programs or Programs. Select
EPSON Software, then select Document Capture Pro.
80


