


70064072_V_2_2.DOC
19/40
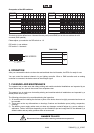
DANGER TO LIFE!
Before taking into operation for the first time, the installation has to be approved by an expert!
5.2 Attachment
Before attaching the device, make sure that the installation area can hold a minimum point load of 10 times
the device's weight.
The device must only be installed absolutely planar at a vibration-free, oscillation-free and fire-resistant
location. Make sure that the device is installed absolutely planar by using a water-level.
The device must be installed out of the reach of people.
The device must always be installed via all fixation holes. Do only use appropriate screws and make sure
that the screws are properly connected with the ground.
The durability of the installation depends very much on the material used at the installation area (building
material) such as wood, concrete, gas concrete, brick etc. This is why the fixing material must be chosen to
suit the wall material. Always ask a specialist for the correct plug/screw combination indicating the maximum
load and the building material.
Procedure:
Step 1: On the baseplate, there are the holes for the installation.
Step 2: Hold the baseplate onto the location where the device is to be installed.
Step 3: Mark the boreholes with a pen or a suitable tool.
Step 4: Drill the holes.
Step 5: Hold the baseplate in the desired position and tighten it.
DANGER TO LIFE!
Before taking into operation for the first time, the installation has to be approved by an expert!
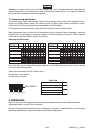
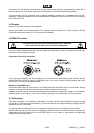
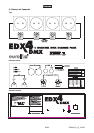
5.3 Analog input
Connect your light controller with the Analog Input socket.
The occupation of the 8-pin DIN-socket is as follows:
1. Channel 1 4. Channel 2 7. Not connected
2. Ground 5. Channel 3 8. 15 V DC (Output)
3. Channel 4 6. Not connected
5.4 Connection with the mains
Connect the device to the mains with the power-plug.
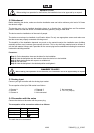
The occupation of the connection-cables is as follows:
Cable Pin International
Brown Live L
Blue Neutral N
Yellow/Green Earth
The earth has to be connected!