5
If you see more than one option, take the thickness that
best suits your purpose
: The
thicker the pouch, the more rigid and wear-resistant the laminated sheet will be.
If you are not sure of the paper’s weight or are laminating
materials other than paper
,
the combined thickness of the pouch and contents should be your guide. The maximum in
this case is the equivalent of a stack of 8 sheets of standard office paper. (See Pr o d u c t
Pr o f i l e.)
To ensure
h i g h - quality results
, always:
•
Leave a free margin
around the contents of at least 3 mm, or 1/8 inch, on the three
unsealed sides of the pouch. This will guarantee a strong seal. If you put more than
one item in the pouch and want to cut them out individually, make sure you have at least 6
mm, or 1/4 inch, between them.
•
Cut to size only after lamination.
If even a small pouch will leave too much space
around your contents or if you want the lamination to conform to their shape, wait until
they are laminated before cutting: A laminating pouch is precision-cut to ensure minimal
leakage of adhesives, and this cannot be replicated with scissors or paper-cutters. Yo u’ l l
also find the pouch easier to cut afterwards.
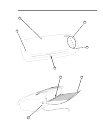
To begin laminating,
plug in the machine, lift back the cover
A
and press the power but-
ton
B
, which will start the rollers turning. Make sure you have enough space behind the
laminator to open the cover completely because it will operate only when the cover is in
this position
H
. (This safeguard ensures adequate motor ventilation, while providing sup-
port for sheets as they exit the machine.)
If you plan to laminate in both the cold and hot modes in one session,
start with cold
, so
you don’t have to wait one to two hours for the machine to cool down. In either case, to
save energy and reduce wear-and-tear on your machine, turn off the machine when you’re
finished, again pressing the power button. If you forget, the machine will
switch itself off
automatically after one hour of inactivity.
Cold Lamination
With the contents and the pouch you have selected at hand:
1 .
Press , if necessary.
Your machine will be on this setting when you turn it on, so if it is
at room temperature, you will almost immediately see the green standby light
E
go on
and hear the ready signal.
2 .
Open pouch and place contents face up
onto the transparent, non-adhesive side,
allowing for the 3 mm, or 1/8 inch, free margin. Leave the pouch open, with the adhesive
side, which is covered by a glossy protective sheet, upright.


