


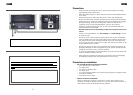

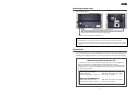

OPEN/CLOSE
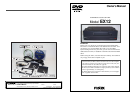
EX12 EXTERNAL DRIVE UNIT
IEEE1394/USB
HD
PD-6
ON
OFF
POWER
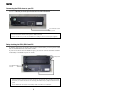
1
2
3
45
6
7
8
910
1112
13
TO RAIN OR MOISTURE.
SHOCK, DO NOT EXPOSE THIS EQUIPMENT
TO REDUCE THE RISK OF FIRE OR ELECTRIC
WARNING:
NE PAS OUVRIR
RISQUE DE CHOC ELECTRIQUE
AVIS:
RISK OF ELECTRIC SHOCK
DO NOT OPEN
CAUTION
56
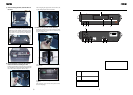
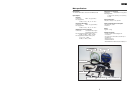
9) Fasten the fixing screw of each fastening.
Confirm both the left and right fastenings are
fixed tightly.
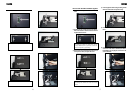
7) After connecting the cable, stack the PD-6 on
the EX12.
<Note>:
When stacking the PD-6 on the EX12,
make sure to perfectly fit the dent of PD-6
rubber feet to the metallic projections of each
EX12. Otherwise, the PD-6 may malfunction
or generate a noise because of imperfect
grounding.
8) Use the fastenings on both the left and right
sides of the EX12 to fastening the PD-6.
After hanging the projection on the PD-6, lift
up the fixing angle until it is locked.
Now you complete stacking the EX12 and PD-6
together.
The next step is to connect the power cords.
See the next page.
Pull up the metallic projection of each fasten-
ing and hang it on the PD-6.(The following pic-
tures show the example of the left side.)
Fasten the fixing screw of each fastening so that
the fastening may not be off. Be careful not to
apply excessive force.