


14
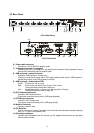
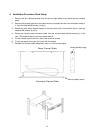
3) After each host and switch device have been connected, connect the keyboard, mouse,
and monitor to the [CONSOLE] connectors on the switch device.
4) Attach switch device's AC power cable and then plug it into an electric outlet.
5) After confirming that the connections have been made correctly, start up the attached
hosts.
6) Acquire Plug-n-Play data for the monitor.
When a monitor is first attached to the switch device, its Plug-n-Play data (EDID data)
needs to be acquired by the switch device. Re-start the host to be able to use the
monitor with the acquired environment.
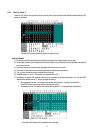
[Plug-n-Play data setting]
After connect the monitor to the switch device, push reset_sw or open the OSD via
the hot key press, then go to EDID setting mode (using NEXT PAGE), and press the
Enter key.
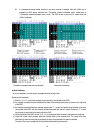
7) Select each port in turn and confirm the attached host is started up and using the
correct settings.
8) If the keyboard, mouse, or monitor is not set correctly, adjust the settings and restart
the system.
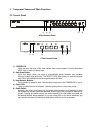
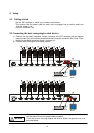
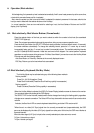
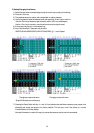
5.3. Connecting the hosts (using cascaded connections)
1) Connect the hosts one through eight to the second level of switch devices (called
slaves), in the same way as for the [first level].
2) Next, use the special cables to attach the host port connector of the first level switch
device (called master) to the [PS/2 keyboard], [PS/2 mouse], and [monitor] connectors
on the console ports of the second level slave switch devices.
3) To increase the number of slaves, connect them in the same way as described in steps
1 and 2 above. Do not connect slaves beyond the second level. Three level connection
does not work.
USB Keyboard, Mouse
Monitor
Second level
(Slave)
First level
(Master)
d
d