


12
2.3 Settings for Two Network Sounders
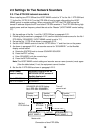
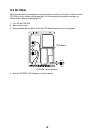
2.3.1 Two ETR-30N network sounders
When installing two ETR-30N set the HOST NAME control to “0” for the No. 1 ETR-30N and
“1” for the No. 2 ETR-30 N. Turn the ETR-30N off and on again after setting the HOST
NAME control to register settings. When connecting NET KP, the ETR-30N having the
lowest IP address outputs the KP and other ETR-30N receives it. The ETR-30N having high
output power and low frequency should be set as the “Master” (HOST NAME control setting
“0”).
1. Set tap settings of the No. 1 and No. 2 ETR-30N as in paragraph 2.2.1.
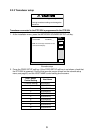
2. Following the procedure in paragraph 2.2.2, confirm that the sounder source for the No.1
ETR-30N is “SOUNDER.” (HOST NAME control is set to “0.”)
3. Set up the No. 1 ETR-30 as shown in paragraph 2.2.3.
4. Set the HOST NAME control of the No. 2 ETR-30N to “1” and then turn on the power.
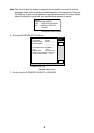
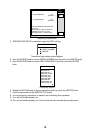
5. As shown in paragraph 2.2.2, set sounder source for “SOUNDER1” on the NavNet
display unit as below.
a) Rotate the [ENTER] knob to choose SOUNDER SOURCE.
b) Press the EDIT soft key.
c) Enter SOUNDER1 with the numeric keys.
d) Press the RETURN soft key.
Note: The HOST NAME control setting and sounder source name (numeric) must agree.
(See the table below.) If not, the equipment cannot function.
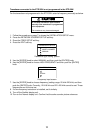
6. Set the No. 2 ETR-30N as shown in paragraph 2.2.3.
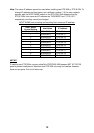
HOST NAME
control setting
SOUNDER SOURCE set on
NETWORK SETUP screen of
NavNet display unit
No. 1 ETR-30N: 0 SOUNDER_
No. 2 ETR-30N: 1 SOUNDER1
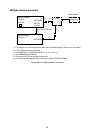
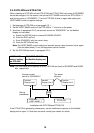
HUB
NavNet
Display Unit 1
NavNet
Display Unit 2
NavNet
Display Unit 3
NET KP
ETR-30N No.1
HOST NAME: 0
ETR-30N No. 2
HOST NAME: 1
Turn off
power to set.
Master side
Set No.1
ETR-30N first.
Set No.2
ETR-30N
second.
SOUNDER SOURCE Setting:
No.1 ETR-30N: SOUNDER
No.2 ETR-30N: SOUNDER1
Connection of two ETR-30Ns