


Chapter 2: Unit Installation
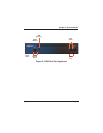
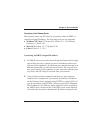
Side-by-side Rack Mount:
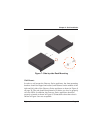
In order to rack mount the Gateway Series appliance side-by-side with
another Gateway Series appliance, place one of the short mounting
brackets on the front of the left side of the first Gateway Series appliance.
Line up the holes from the mounting bracket to the threaded holes on the
front of the left side of the first Gateway Series appliance. Two #8 black
truss head screws should be inserted and turned clockwise to fasten the
mounting bracket. Repeat these steps when installing a short mounting
bracket on the front of the right side of the second Gateway Series
appliance.
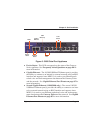
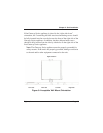
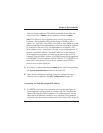
Each of the three #6 pan head screws should be inserted into a shoulder
washer as shown in Figure 7 on page 29. Make sure the narrow side of the
shoulder washer is away from the head of the screw. The three screws
should then be inserted and turned clockwise to fasten to the side-by-side
holes on the right side of the first Gateway Series appliance. Do not
overtighten the screws or the shoulder washers could be damaged.
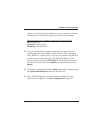
Connect the first and second Gateway Series appliances together by
putting the heads of three screws & shoulder washers into the three keyed
insets. Then push down on the second Gateway Series appliance as shown
in Figure 7. Make sure the units are flat against each other before pushing
the second unit down. Otherwise the shoulder washers may be damaged.
Use two truss head screws (not supplied) on each mounting bracket to
secure both Gateway Series appliances to a rack.
Digium, Inc. Page 28