IV. Installation and Configuration
System Requirements
You must meet the following requirements to install and configure the MicroGate™:
• Static IP address, Subnet Mask, and Gateway Address to assign the
MicroGate™
• A computer equipped with a 10 Mbps, 100 Mbps, or 10/100 Mbps Fast
Ethernet Card, or USB-to-Ethernet converter. Computer must have TCP/IP
protocols installed and have a fixed (static) or dynamic IP Address assigned to
it.
• MicroGate Discovery Utility CD (might be bundled with Raptor Web
Software™ CD)
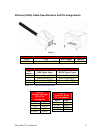
• Network Cable connecting MicroGate™ directly to the computer (use a
Crossover type cable, see Table 11), or network cable connecting to the same
hub/switch that the computer is connected to (use Straight-Through type
cable, see Table 10).
• +5VDC Power Supply with mating connector
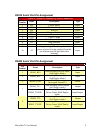
• Serial cable connecting your device(s) to one of the serial ports (see Table 5,
Table 6, and Table 7)
Connect the System
The MicroGate™ can be placed at any convenient location in the kitchen or office.
No special cooling requirements are needed, but you should keep the MicroGate™
away from any heating device, dusty or wet environments. If the MicroGate™ needs
to operate in a dusty or wet environment, it should be placed in a NEMA box. Make
sure to disconnect the power, remove the power cord from the outlet, and keep your
hands dry when handling the MicroGate™.
Basic Installation Procedure
1. Connect an Ethernet Cable from the MicroGate™ to one of the following:
a. Ethernet Port on computer using a Crossover type cable (see Table 11)
b. Ethernet Port on hub, switch, or router using a Straight-Through type
cable (see Table 10)
2. Connect a serial cable from your device(s) to one of the serial ports on the
MicroGate (see Table 5, Table 6, and Table 7 for pin assignments)
3. Connect the power cable to the MicroGate (see Table 3 or Table 4)
4. Plug the other side of the power cable to a +5VDC source, or to a wall outlet
if you are using a cable with power supply
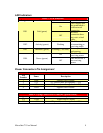
5. Verify that DS1(Link) and DS4(Power) LEDs are on (see Table 2)
6. After approximately 30 seconds, verify that DS3 (Heartbeat) LED is flashing
MicroGate™ User Manual 12


