


GN-FE605(M) PCI Adapter User’s Guide
9
5. Installation Procedures
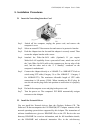
5.1 Insert the Networking Interface Card
Step1. Switch off the computer, unplug the power cord, and remove the
computer’s cover.
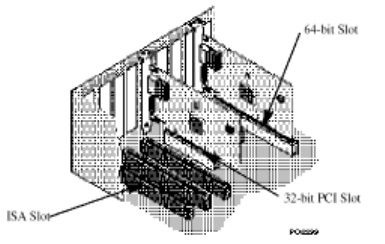
Step2. Select an unused PCI bus-master slot and remove its protective bracket.
Step3. Push the Adapter into the slot until the adapter is securely seated. Then
secure the adapter bracket with a screw.
Step4. Attached the Wake-On-LAN cable (Optional). If you require
Wake-On-LAN capability from a powered-off state, attach one end of
the 3-pin Wake-On-LAN cable to the connector on the top edge of the
card, and the other end to the “5 V Standby” connector on the
computer’s motherboard.
Step5. Connect the Adapter directly to a 10BASE-T or 100BASE-TX hub or
switch using UTP cable (Category 3,4 or 5for 10BASE-T;Category 5
for 100BASE-TX). The maximum allowable length of UTP cable
connections is 100 meters (328ft). When inserting an RJ-45 plug, be
sure the tab on the plug clicks into position to ensure that it is properly
seated.
Step6. Put back the computer cover and plug in the power cord.
Step7. Turn the power on. The computer's PCI BIOS automatically assigns
resources to the Adapter.
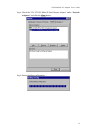
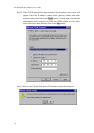
5.2 Install the Network Driver
You can install the Network drivers from the Gigabyte Software CD. The
Software CD that accompanies the GN-FE605(M) PCI Adapter contains all the
network operating system drivers supported by this Adapter. The instructions of
software installation are given as README files on the CD. Review the root
directory README for overview information, and for full installation details,
see the README and referenced instruction files in the sub-directory