The light tubes
e Flextight X5 contains two light tubes: one for illuminating reflective originals
from above, the other for shining light through transparencies from below. e
Flextight X1 has only one light tube for transparency scanning.
NOTE! e two lamps are of different types and are not interchangeable.
Replacing the light tubes
If scans are suddenly coming out black (or all white if you are scanning negatives),
then one of your light tubes may be defective. Make a preview using both types of
scans (transparent and reflective) to find out which tube is affected.
• If transparencies are not working, then the bottom tube may be burned out.
• If reflectives are not working, then the top tube may be burned out.
Follow the procedure below to replace a tube:
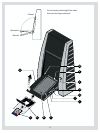
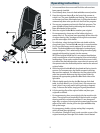
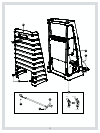
(See Figure on next page)
1. Obtain the appropriate replacement lamp (ask your Flextight dealer).
2. Turn o and unplug the scanner from the primary power supply.
3.
IMPORTANT: Let the light tubes cool down for approx. 10 minutes before
proceeding.
3. Remove the two allen screws
A (one in each side) using a 2.5 mm Allen key.
Do not remove any other screws.
4. Press the back panel down (app. 5 mm) and lift out using the handle
B
5. Turn the feed table to upright position.
6. Locate the tube to be replaced and dismount the plug
C.
7. Remove the defective tube:
• Press the aps backwards to release the tube
E.
• Pull the tube gently out of the holders and then sideways out of the scanner.
8. If you are replacing the transparencies tube, you need to disassemble the tube from
the sockets as well:
• Remove the screw
F to release the left socket G.
• Remove the right socket
H by simply pulling it o (you may need to use a small
screwdriver to loosen this socket).
• Assemble the new tube with the sockets.
9. Insert the replacement tube and mount it into the holders making sure that it is
properly held in place by the aps.
10. Connect the plug
C.
11.
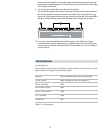
IMPORTANT: The “T” on the lamp board cover D indicates the socket for the
transparencies tube.
12. Lower the feed table
E.
13. Mount the back panel and the two allen screws following the reverse of the
procedure used when removing them.
14. Turn on the scanner and check function of the new tube.
14


