


4. Log out of the system, and then log back in to start using the revised profile.
5. Verify the Sun JDK installation was successful by entering the following:
# java –version
The following messages appear:
java version "1.5.0_10"
Java(TM) 2 Runtime Environment, Standard Edition (build 1.5.0_10-b03)
Java HotSpot(TM) 64-Bit Server VM (build 1.5.0_10-b03, mixed mode)
Installing and Configuring Tomcat
The following procedure provides the steps for installing and configuring Tomcat.
NOTE: Prior to installing Apache Tomcat, you must verify that JDK is installed and configured
on your system.
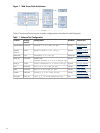
1. Download the Tomcat Web Server package from the Apache Software Foundation website
and follow the instructions provided to install it. See Table 1 (page 12) for the correct version
and website link.
NOTE: In the following steps, it is assumed that Tomcat is installed in
/usr/local/apache-tomcat; if Tomcat is installed in a different directory, replace
/usr/local/apache-tomcat with the correct path.
2. Set the CATALINA_HOME environment variable to the Tomcat directory path by editing
/etc/profile and adding the following lines to the end of the file:
CATALINA_HOME=/usr/local/apache-tomcat
export CATALINA_HOME
3. Log out of the system, and then log back in to it to start using the revised profile.
4. Start Tomcat by entering the following:
# /usr/local/apache-tomcat/bin/startup.sh
The following messages appear:
Using CATALINA_BASE: /usr/local/apache-tomcat
Using CATALINA_HOME: /usr/local/apache-tomcat
Using CATALINA_TMPDIR: /usr/local/apache-tomcat/temp
Using JRE_HOME: /usr/local/jdk
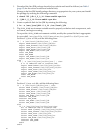
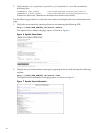
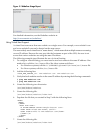
5. Verify that the Tomcat installation once the startup is complete by opening a browser and
entering the following URL:
http://<YOUR_TOMCAT_SERVER_IP>:8080
The Tomcat web page is displayed as in Figure 5.
Figure 5 Tomcat Successful Installation Verification
Installing, Configuring, and Managing Web Server Middleware Stack Components 17