


Installation and configuration procedures 5
2 Installation and configuration procedures
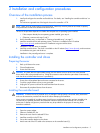
Overview of the installation process
1. Install and configure the controller and hard drives. For details, see “Installing the controller and drives” on
page 5.
The maximum supported size of the logical drive on this controller is 2 TB.
NOTE: Select drives of equal capacity and performance. Otherwise, the array tends to be limited in capacity
and performance to that of the smallest and slowest drive.
The rest of the procedure depends on whether the computer has an operating system installed.
• If the computer already has an operating system installed, go to step 4.
• Otherwise, continue with steps 2 and 3.
2. Build a bootable array, as described in “Creating a bootable array” on page 7.
3. Install the controller driver and operating system. The driver is available on the HP website
(http://www.hp.com
), and instructions for installation are given with the driver.
Installation in the new server is complete.
4. Install the controller driver. The driver is available on the HP website (http://www.hp.com
), and instructions
for installation are given with the driver.
Installation in the preconfigured server is complete.
Installing the controller and drives
Preparing the server
1. Back up all data on the server.
2. Close all applications.
3. Power down the server.
CAUTION: In systems that use external data storage, be sure that the server is the first unit to be powered
down and the last to be powered back up. Taking this precaution ensures that the system does not erroneously
mark the drives as failed when the server is powered up.
4. Power down all peripheral devices that are connected to the server.
5. Touch the system chassis so that you are grounded.
6. Unplug the AC power cord from the outlet and then from the server.
7. Disconnect all peripheral devices from the server.
Installing the controller board
WARNING! To reduce the risk of personal injury or damage to the equipment, consult the safety information
and user documentation provided with the server before attempting the installation.
Many servers are capable of providing energy levels that are considered hazardous and are intended to be
serviced only by qualified personnel who have been trained to deal with these hazards. Do not remove
enclosures or attempt to bypass any interlocks that may be provided for the purpose of removing these
hazardous conditions.
1. Open the system cabinet.
2. Select an available PCI slot.
3. Remove the cover from the selected PCI slot.
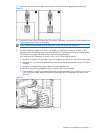
4. Install the controller in the PCI slot.
5. Secure the controller bracket to the chassis.
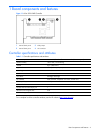
6. Attach one end of the I2C cable to the connector on the controller board (1).