


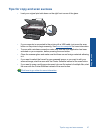


7 Connectivity
Add the HP All-in-One to a network
• WiFi Protected Setup (WPS)
•
Traditional Wireless Connection
•
USB Connection
WiFi Protected Setup (WPS)
To connect the HP All-in-One to a wireless network using WiFi Protected Setup (WPS),
you will need the following:
❑
A wireless 802.11 network that includes a WPS-enabled wireless router or access
point.
❑
A desktop computer or laptop with either wireless networking support, or a network
interface card (NIC). The computer must be connected to the wireless network that
you intend to install the HP All-in-One on.
To connect the HP All-in-One using WiFi Protected Setup (WPS)
1. Do one of the following:
Use Push Button (PBC) method
▲ Set up wireless connection.
❑
Press the wireless button on the control panel to show the wireless menu
options on the printer display.
❑
Select Wireless Settings on the printer display.
❑
Select WPS.
❑
Select Push Button and follow the on-screen instructions on the printer
display.
NOTE: The product begins a timer for approximately two minutes in which the
corresponding button on the networking device needs to be pressed.
Use PIN method
▲ Set up wireless connection.
❑
Press the wireless button on the control panel to show the wireless menu
options on the printer display.
❑
Select Wireless Settings on the printer display.
❑
Select WPS.
❑
Select PIN. The printer display will display a PIN.
Add the HP All-in-One to a network 35
Connectivity