


Upgrading and Servicing Guide 5
NOTE:
If you have the S0000 series, and you
removed a 7-In-1 memory card reader, continue to
step 7; otherwise, you are finished with the task of
removing a drive from the chassis.
If you have the 8000 series and you removed a
hard disk drive, a 7-In-1 memory card reader, or
an optical drive, you are also finished with this
task. If you have the 8000 series and you removed
a diskette drive, continue to step 6.
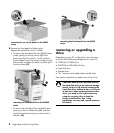
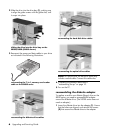
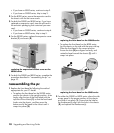
6 For an 8000 series diskette drive, squeeze inward
on both sides of the bracket brace and lift the brace
up and out (1). Remove the two sets of screws (2)
(left and right sides) that secure the drive to the
drive adapter. Lift the diskette drive out of the drive
adapter (3) by sliding the drive back and then up.
Ensure that the guide screws (4) (left and right
sides) are left in the drive adapter. You are finished
with the task of removing the drive.
2
2
3
1
2
4
removing a diskette drive from the drive
adapter on the 8000 series
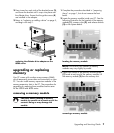
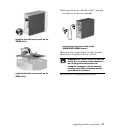
7 For the S0000 series 7-In-1 memory card reader,
remove the reader from the drive bay adapter if the
adapter is not included with your replacement
reader. Remove the two screws (left and right sides)
that secure the reader to the adapter. Lift the reader
out of the adapter by sliding the reader back and
then up. You are finished with the task of removing
the reader.
removing a 7-in-1 memory card reader from
the drive bay adapter on the S0000 series
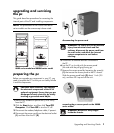
replacing or adding a drive
The steps to replace or add a drive are the same for
both the S0000 and 8000 series, except when you
are replacing a diskette drive on the 8000 series, or
the 7-In-1 memory card reader on the S0000 series.
If you are replacing a diskette drive on the 8000
series, before starting step 1 in the following
instructions, you need to fit the diskette drive in a
diskette drive adapter as described in “reassembling
the diskette adapter” on page 6.
If you are replacing a 7-In-1 memory card reader,
before starting step 1 in the following instructions,
reassemble the reader in the drive bay adapter as
described in step 7 of “removing a drive” on page 3.
If you are replacing or adding any other drive, begin
with step 1 in the following instructions.
to replace or add a drive
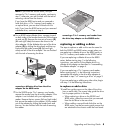
1 Install four guide screws on the sides of the drive
(two on each side). The screws help guide the drive
into its proper position in the bay.
• When replacing a drive on the S0000 and
8000 series, place the screws that you removed
from the old drive in the new drive.
• When adding a second hard disk drive on the
8000 series, use the four extra guide screws that
are attached to the chassis under the front bezel.