


Hardware options installation 45
o
Menu Option 2 = 533 MHz
— Memory bus speed is set to 533 MHz regardless of how many DIMMs are installed provided
that all DIMMs detected in step 1 are rated for 533 MHz or greater.
The following rules must be followed when installing DIMMs in this server:
• DIMMs must be installed in pairs while following the population rules listed in the table below.
• DIMMs must be installed in decreasing capacity with the largest DIMMs installed in the banks
farthest away from each processor.
• DIMM pairs in a memory bank must have identical HP DIMM part numbers.
• Only HP DIMM part numbers listed in the QuickSpecs for this server should be used in this server.
DIMM population order
Bank A Bank B Bank C Bank D Bank E Bank F Bank G Bank H
Configuration 1A & 2A 3B & 4B 5C & 6C 7D & 8D 9E & 10E 11F & 12F 13G & 14G 15H & 16H
1 processor 1st 2nd 3rd 4th — — — —
2 processors 1st 2nd 3rd 4th 1st 2nd 3rd 4th
Advanced ECC memory is the memory protection mode for this server. In Advanced ECC, the server does
not fail because of correctable memory errors. The server provides notification if the level of correctable
errors exceeds a pre-defined threshold rate. Advanced ECC provides additional protection over standard
ECC because it is possible to correct certain memory errors that would otherwise be uncorrectable and
result in a server failure. Whereas standard ECC can correct single-bit memory errors, Advanced ECC
can correct single-bit memory errors and multi-bit memory errors if all failed bits are on the same DRAM
device on the DIMM.
Installing DIMMs
CAUTION: For proper cooling do not operate the server without the access panel, baffles,
expansion slot covers, or blanks installed. If the server supports hot-plug components, minimize
the amount of time the access panel is open.
1. Power down the server (on page 20).
2. Extend the server from the rack (on page 20).
3. Remove the access panel (on page 21).
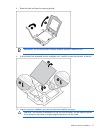
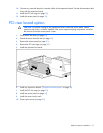
4. Remove the PCI riser cage (on page 22).
5. Remove the air baffle (on page 23).
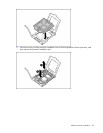
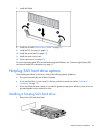
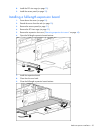
6. Open the DIMM slot latches.