


Chapter 4 47
Viewing Catalogs and Saving Files
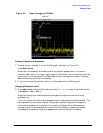
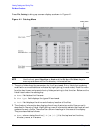
File Menu Functions
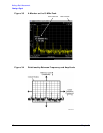
b. Type: column displays the extension of the filename, for example, .SET, .STA,
.TRC. Directories are displayed as DIR and drives have nothing listed under Type:.
They are only designated by the Name: column ([-A-] or [-C-]).
c. Size: column displays the size of the file in bytes.
d. Modified: column displays the date and time the last change occurred.
3. The softkey menu has four options:
a. Type: allows you to choose the type of file you wish to view. (You may view all types
by using the
All key under Type.)
b. Sort: Under the Sort key, you can sort by any of the four columns and you can choose
up (ascending) or down (descending).
c.
Dir Up: moves you up one directory level. If you are already at the top level, this key
moves you up to the drive level, displaying the available disk drives.
d.
Dir Select: moves you down into the highlighted directory or up into the next level
(directory or drive) if the “. .” under the Name: column is highlighted.
NOTE Navigation keys: Use the front-panel Step Keys or Knob and the Dir Up or Dir
Select keys to move around in the directory information box.
4. The drive space line shows the number of bytes used on the drive and the number of
bytes still free on the drive.
Creating a directory
Directories and sub-directories can be created on both the A: floppy disc and the internal
C: drive. This allows maximum flexibility in organizing files. For this example, we will
create a directory on the C: drive.
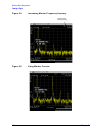
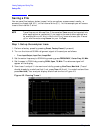
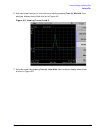
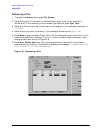
1. Press
File, More 1 of 2, Create Dir. Your screen should look similar to Figure 4-1, except
the entry fields will be Dir Name: and Path: and the Heading will read: Directories.
2. Navigate through the file system until the Path: field displays C:\. (Use the Step Keys,
Knob, Dir Up, and/or Dir Select keys.)
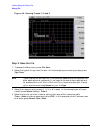
3. Press
Name and enter the name, “START” using the Alpha Editor. (The numeric keypad
is also available for the filename.) Press
Enter (hardkey) when the Dir Name: field
contains this directory title. (Use the
Bk Sp hardkey on the front panel to make
corrections.)
4. Press Create Dir Now to execute the operation. The message: Creating Directory
appears on the screen. Then the status bar displays: Directory C:\START created.
5. To make a sub-directory, scroll down to the START directory you just created and press
Dir Select. The Path: field should now read: C:\START\. Repeat Steps 3 and 4 above,
using a new name. The status bar now should read: Directory C:\START\new name
created.