


6
Section 1: Gelling Started
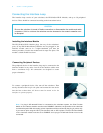
Connecting the Interface Loop
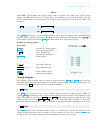
The interface loop consists of your calculator, the HP 82160A HP-IL Module, and up to 30 peripheral
devices. These should he connected according to the instructions below.
Installing the Interface Module
The HP 82160A HP-IL Module plugs into any of the calculator's
ports. (If any HP 82106A Memory Modules are also plugged in, the
interface module must be in a higher-numbered port than the
memory modules.) Push in the module until it snaps into place. The
module's switch should face down.
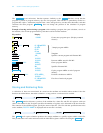
Connecting Peripheral Devices
The peripheral devices in the interface loop may be connected to the
interface module in any order—but all of the interface cables must
form a continuous loop. All connections are designed to ensure
proper orientation.
To connect a peripheral device, first turn off the calculator. Then
merely disconnect the loop in one place and connect the new device
into the loop at that place. All devices must be turned on for the
interface to operate properly.
Note: If a plug-in HP 82143A Printer is connected to the calculator system, the Print Function
Switch on the interface module must be set to DISABLE. Otherwise, the operation of the calculator
could be disrupted. With this setting, primer operations will be executed by the plug-in printer only.
If you want to print using the HP-IL print functions and an HP-IL printer, the Print Function Switch
on the interface module must be set to ENABLE and a plug-in HP 82143A Printer must not be
connected.
CAUTION
Be sure the calculator is turned off before connecting or disconnecting the module and cable
connectors. If this is not done, the calculator may be damaged or the system's operation may
be disrupted.