


Operating the Monitor
User’s Guide 4–15
Adjusting Screen Quality
The auto-adjustment feature automatically fine-tunes the image
quality for display size, position, clock, and phase each time a
new video mode is displayed. For more precise adjustments of
VGA input, run the Auto-Adjustment software on the CD. See
“Using the Auto-Adjustment Function” in this chapter.
If additional image quality improvement is desired, use the Clock
and Phase controls of the monitor to fine-tune the image. See
“Optimizing Analog Video” in this chapter.
Optimizing Analog Video
This monitor contains advanced circuitry that allows the monitor to
function as a standard analog monitor. Two controls in the
Advanced Menu OSD can be adjusted to improve analog image
performance:
■ Clock — Increase or decrease the value to minimize any
vertical bars or stripes visible on the screen background.
■ Clock Phase — Increase or decrease the value to minimize
video distortion or video jitter.
Use these controls only when the auto-adjustment function does not
provide a satisfactory monitor image in analog mode.
To obtain the best results:
1. Allow the monitor to warm up for 20 minutes before adjusting.
2. Display the adjustment pattern application provided on
the CD.
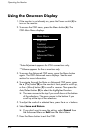
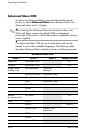
3. Access the Advanced Menu OSD; select Image Control.
4. Set the main Clock correctly first, because the Clock Phase
settings depend on the main Clock setting.
❏ When adjusting the Clock and Clock Phase values, if the
monitor images become distorted, continue adjusting the
values until the distortion disappears.
To restore the factory settings, access the Advanced Menu OSD,
select Factory Reset, and then select Yes.