


2-18
Using the ProCurve Web Browser Interface
Web Configuration
Using the ProCurve Web
Browser Interface
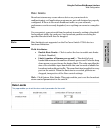
■ IP-Info: The source and destination IP addresses and TCP/UDP ports in a
frame are used to determine the output link in the trunk. This mode works
best for switch-to-router trunk links where traffic through the switch is
received from and destined for many different hosts.
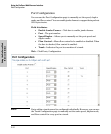
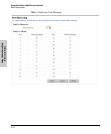
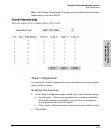
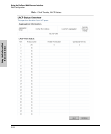
Defining the Members of a Trunk
1. On the Trunks Membership page, click on the radio button in any one of
these columns of the corresponding trunk.
For example, if you want ports 2, 3, 4, and 5 to become members of Trunk
2, click the radio buttons for 2, 3, 4, and 5 under the column labeled “Trunk
T2.”
2. Click APPLY.
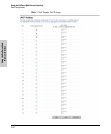
Deleting the Members of a Trunk
1. On the Trunks Membership page, click on the radio button under the
column labeled “Not a Trunk Member” for any port you want to remove
from a trunk. To delete a trunk, remove all port members from that trunk.
For example, if you want to remove ports 2, 3, 4, and 5 from Trunk 2, click
the radio buttons for 2, 3, 4, and 5 under the column labeled “Not a Trunk
Member.”
2. Click APPLY.
Note For the 8 port switch, you can only create up to a maximum of 4 trunks of up
to 7 ports each.
Field Attributes
• Port – The port number.
• Not a Trunk Member – If the radio button in this column is selected,
the port is not a member of any trunks. This is the default state.
• Trunk T1-T12 – These columns correspond to the trunks that are
supported by the switch. To assign a port to a trunk, click on the radio
button in any one of these columns of the corresponding trunk and
then click APPLY.