


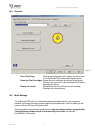

OptiPrinter PRO CD/DVD Inkjet Printer
ZZ 004 821 - 24 -
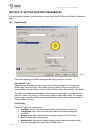
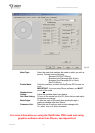
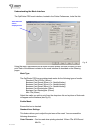
Follow the on screen instructions.
1. Step 1: Set both offsets to ‘0’. This is the default setting.
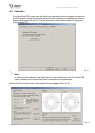
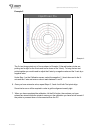
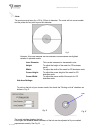
2. Step 2: Place a disc onto the CD tray and retract the tray into the printer. Click ‘1
st
Test
Print’. A series of solid black circles will print onto the disc as shown in Fig. 24 on the
previous page.
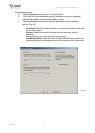
3. Step 3: rotate to discs 180 degrees in the CD tray and retract the tray once more into the
printer. Click ‘2
nd
Test Print’. A series of broken, red circles will print onto the disc as shown
in Fig. 24 on the previous page.
4. If the printer is in calibration, the 2
nd
Test Print should sit directly on top of the 1
st
. If this is
not the case, the ‘Offsets’ need to be adjusted.
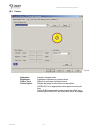
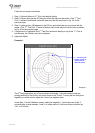
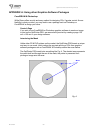
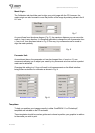
5. Adjust the Offset
Example 1
The 2
nd
test image prints out of line as shown in Example 1 (the red broken circles are
printing perfectly on the X-Axis, but too far down on the Y-Axis). To bring the two test prints
together you would need to adjust the Y-axis by a negative value.
Under Step 1 on the Calibration screen, select the negative (‘-‘) check box next to the Y-
axis and enter a value between 1 and 5. An offset value of 1 will move the print position by
0.01” or 0.254mm.
Example 1
2
nd
Test print (red
broken circles) is
printing too far
down the Y-axis