


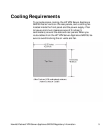


Hewlett-Packard VPN Server Appliance SA3150 Regulatory Information 9
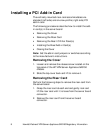
Removing the Rear I/O Filler Panel(s)
Perform the following steps to remove the I/O filler
panel(s) from the rear panel of the server:
1.
Use a Phillips screwdriver to remove the two screws
securing the filler panel retention bracket to the top
edge of the rear panel.
2.
Remove the retention bracket.
3.
Remove the filler panel from the expansion slot for the
type of add-in card(s) you are installing.
Installing the Riser/Add-in Card(s)
Perform the following steps to install the riser, with the
add-in card(s) attached, on the server board:
1.
Align the riser card edge connector with the mating
riser connector on the server board. (The connectors
are keyed to mate in only one direction.)
Note: If you installed a low-profile card on the riser,
ensure that the right side of the low-profile card
bracket fits into the narrow slot on the right side of the
add-in card expansion slot.
2.
Firmly press the riser/add-in card(s) straight down all
the way into the mating connector on the server board.
3.
Use the Phillips screwdriver and the two screws
removed in the preceding procedure, “Removing the
Rear I/O Filler Panel(s),” to securely attach the filler
panel retention bracket to the top of the server rear
panel.
CAUTION: If you installed only one add-in card, ensure
that the empty expansion slot has a filler panel
installed before you attach the filler panel retention
bracket. An open expansion slot reduces the cooling
and EMI integrity of the server.