


74 Reference Guide
Troubleshooting
❏ Ensure the projection screen is 1.5 to 14 m (5 to 46 ft) from the
projector. It can be farther if a long range add-on lens is installed.
❏ For a computer connection, set the display resolution on the
computer to 1024 x 768.
❏ Check the projection lens to see if it needs cleaning.
If an upside-down or reversed image is displayed:
❏ The projector has been set to the wrong position setting. Open the
on-screen menu, select setup > Projector position, and choose
the correct setting
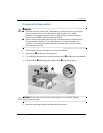
If the image is too small or too large:
❏ Adjust the zoom ring on top of the projector.
❏ Ensure the projector is 1.5 to 14 m (5 to 46 ft) from the projection
screen.
❏ Open the on-screen menu and select adjust picture > Aspect
ratio. Set to Best fit. For a wide-screen picture, try setting the
aspect ratio to 16:9.
❏ See “To install an add-on lens” on page 57 for more information.
If the image has slanted edges:
❏ As much as possible, reposition the projector so that it is centered
on the screen and level with the bottom or top of the screen.
❏ Open the on-screen menu and select adjust picture > Keystone
correction. Adjust the horizontal and vertical settings as needed.
If a scrolling or cut-off image is displayed:
❏ Press the auto sync button on the projector or remote control.
❏ If the Magnify function is activated, press enter to cancel it.
❏ For a computer connection, turn everything off, then power on the
projector first and power on the notebook or desktop computer
second.
❏ For a computer connection, if the above steps do not correct the
display image, adjust the resolution of the notebook or desktop
computer to 1024 x 768.