


6 7
BATTERY INSTALLATION
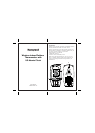
MAIN UNIT
The Wireless Indoor/Outdoor Thermometer main unit
uses 2 “AA” batteries (not included). When the LCD
becomes dim or the respective low battery indicator
shows up on the indoor or remote temperature display,
the battery replacement is required. To install or replace
the batteries, please follow these steps:
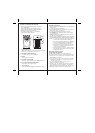
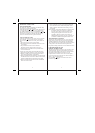
1. Remove the battery compartment door on the back of
the main unit.
2. Insert 2 “AA” size batteries (not included) matching
the polarities shown.
3. Replace the battery compartment door.
HOW TO USE THE TABLE STAND OR
WALL MOUNTING
The main unit has a removable table stand, that supports
it on a flat surface. The unit can also be mounted on
the wall using the recessed screw hole. The stand must be
removed prior to mounting. The remote sensor can be
similarly mounted or placed on a flat surface.
GETTING STARTED
1. After the batteries are installed, remote sensor will
transmit the temperature readings at adout 45 second
intervals.
2. The main unit may take up 2 minutes to receive the
initial readings.
3. Upon successful reception, the remote temperature will
be displayed under the top line of the main unit LCD
display, and the indoor temperature will be displayed
below the remote one.
4. The main unit will automatically update readings at
45-second intervals.
5. After the main unit finishes searching for the temperature
signal from the remote unit(s), the WWVB time signal
receiver will start searching for the atomic time signal.
It takes about 5-8 minutes.
Always place main unit by the window for better reception.
If in 8 minutes the WWVB time signal has not been
received, use the MODE button to set the time manually
(see "setting the time and date manually" section.)
The clock will continue to search for the WWVB time
signal daily from 1:00am to 4:30am. If reception is
successful, the time and date will be updated automatically.
6.You may activate the WWVB receiver at any time by
pressing and holding the button for 3 seconds in the
Hour/Minute/Second display.
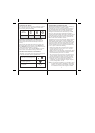
FUNCTION KEYS
Your Wireless Forecaster has 6 easy - to - use function
keys that control its operation:
Use the MODE button:
* To set the time manually
* To view the calendar
Use the button:
* To increase the hour, minute, year, month and date
* To select 12/24 hour format
* To select temperature display unit (ºC or ºF )
* To select the weekday language
* To select the time zone
* To activate reception of the WWVB signal
Use the button:
* To decrease the hour, minute, year, month and date
* To select 12/24 hour format
* To select temperature display unit (ºC or ºF )
* To select the weekday language
* To search for the remote sensor signal
Use the CHANNEL button:
* To view the reading of different remote sensor(s)
Use the MEM button:
* To view the maximum or the minimum indoor or remote
temperature
* To clear the previous temperature records