


7
7
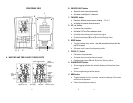
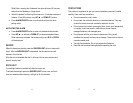
I. WALL- MOUNT RECESSED OPENING
• Keeps the unit on the wall
J. BATTERY COMPARTMENT
• Accommodates 2 (two) UM-3 or AA 1.5V alkaline batteries
K. REMOVABLE TABLE STAND
• Holds unit in upright position on a flat surface
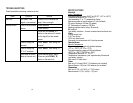
REMOTE SENSOR
FEATURES
• Remote temperature transmission to the main unit via 433 MHz
frequency
• Case can be wall mounted using built-in hanger
• Selection of the temperature display in Celsius or Fahrenheit
• Three channel selection
• LCD displays temperature, and channel
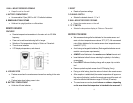
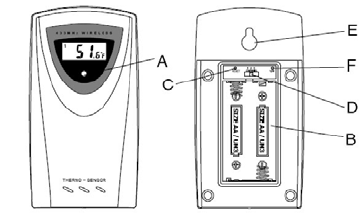
A. LED INDICATOR
• Flashes once when the remote sensor transmits a reading to the main
unit.
• Flashes twice when battery power is low.
B. BATTERY COMPARTMENT
• Holds two AA-size batteries
8
C. RESET
• Resets all previous settings
D. CHANNEL SWITCH
• Selects the desired channel -1, 2 or 3
E. WALL-MOUNT RECESSED OPENING
• Keeps the remote sensor on the wall
F. °C/ °F SWITCH
• Selects the temperature display in Celsius or Fahrenheit
BEFORE YOU BEGIN
• We recommend using alkaline batteries for the remote sensor and
main unit when temperatures are above 32°F (0°C). We recommend
using lithium batteries for the remote sensor when temperatures are
below 32°F (0°C).
• Avoid using rechargeable batteries. (Rechargeable batteries cannot
maintain correct power requirements).
• ALWAYS install batteries in the remote sensor before the main unit.
• Insert batteries before first use, matching the polarity in the battery
compartment
• Press RESET after each battery change with a paper clip or similar
tool.
• Remove protective plastic screen from LCD display (if any).
• During an initial setup, place the main unit close to the remote sensor.
• After reception is established (the remote temperature will appear on
the main unit’s display), position the remote sensor and the main unit
within the effective transmission range of 100 feet (30 meters).
• The remote sensor can be placed indoors or outdoors, depending
on the area where the temperature is intended to be measured. If