


3
Quick Start Guide
Installation Instructions
Congratulations on your purchase of the SANbox
®
9000 Series Fibre Channel Switch. This guide describes the steps to
install and activate your new switch using a Windows® workstation. For advanced options and instructions (including
Solaris
®
, Linux
®
, and Mac OS X
®
installations), refer to the SANbox 9000 Series Stackable Chassis Switch Installation
Guide on the product CD.
NOTE: Do not apply power to the switch until instructed in Step 4.
Step 1. Verify the Package Contents
The SANbox 9000 Series Fibre Channel Switch is shipped with the following items:
1 SANbox 9000 Series Fibre Channel Switch
2 AC Power cords
1 Rail kit
1 RJ-45/RS-232 console adapter
1 Enterprise Fabric Suite 2007 CD
NOTE: Transceivers and stacking cables, if you ordered them, are packaged separately.
Step 2. Mount the Switch
WARNING!! Two people are required to safely lift and install the switch into a rack. To avoid personal injury or damage
to the switch, arrange for assistance.
You can mount the SANbox 9000 Series switch on a flat surface or in a rack. Allow minimum clearances of 2 inches in
front and 8 inches in the rear for cabling.
❑ For a rack mount, install the SANbox 9000 Series rail kit in a standard 19" rack as described in the SANbox 9000
Series Stackable Chassis Switch Rack Mounting Guide that is packaged with the switch.
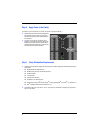
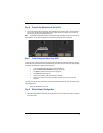
Step 3. Install Transceivers
An SFP transceiver is required for each switch port that will be connected to a device.
❑ To install an SFP transceiver, insert the transceiver into the switch port and gently press until it snaps in place. The
transceiver will fit only one way. If the transceiver does not install under gentle pressure, flip it over and try again.