


AT-FS20x Series Installation Guide
15
Installing the Switch
This section provides a procedure for installing the AT-FS20x switches. When
setting the DIP switches consider the following:
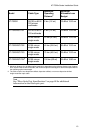
❑ Setting the Auto Neg DIP switch for the twisted-pair port to ON or
OFF enables or disables auto-negotiation for the port. If you disable
auto-negotiation, be sure to set the DIP switches for the port’s speed
and duplex mode to match the speed and duplex mode of the end-node.
❑ For the fiber optic port, set the port’s duplex mode using the
appropriate Duplex Mode DIP switch. This setting must match the
duplex mode capability of the end-node to be connected to the port.
Note
Do not remove the dust cover from the fiber optic port until you are
ready to connect the fiber optic cable. Dust contamination can adversely
impact the operating performance of the port and the switch.
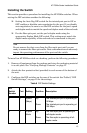
To install an AT-FS20x switch on a desktop, perform the following procedure:
1. Remove all equipment from the package and store the packaging material
in a safe place. See “Verifying Package Contents” on page 11.
2. Attach the four protective feet (provided) to each corner of the bottom of
the unit.
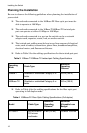
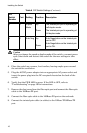
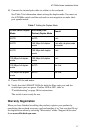
3. Configure the DIP switches on the rear of the switch. See Table 6, “DIP
Switch Settings,” on page 15 for the settings.
Table 6 DIP Switch Settings
DIP
Switch
Number
Port Setting Position Description
1 2 Speed
(Mbps)
Up
Down
The twisted-pair port is operating at
10 Mbps.
The twisted-pair port is operating at
100 Mbps.
2 1 Duplex
Mode
Up
Down
The fiber optic port is operating at
half-duplex mode.
The fiber optic is operating at full-
duplex mode.