


Using the iBN180
P8
7
Replacing and Installing Clock Backup Batteries
Note: 2 AAA batteries are included with the unit. Install them before using the unit.
This model is equipped with a battery backup circuit that will maintain the time and alarm time settings in the event of
a temporary power interruption (the display is NOT maintained). The battery backup circuit will also operate the
buzzer alarm to wake you up at the selected wake up time even if the power is out. When the backup batteries are
getting weak the Low Backup Battery Indicator will begin flashing in the display. When you see this flashing indicator
you should replace the backup batteries as soon as possible. Note: We recommend alkaline batteries for best
performance.
To install/replace the backup batteries:
IMPORTANT: When replacing the backup batteries be sure to have the unit connected to the AC outlet to maintain all of your
settings, otherwise it will be necessary to reset the time and alarm time after the batteries are replaced.
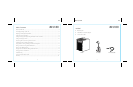
1. Slide and remove the battery door located on the bottom of the unit.
If replacing batteries, remove the exhausted batteries.
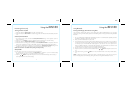
2. Insert 2 fresh AAA batteries in the backup battery compartment.
Make sure the polarity of the batteries (“+” or “-” nodes) matches the
illustration.
3. Slide and close the battery compartment door. Confirm that the
backup battery indicator is not flashing in the display.
Note: Make sure you dispose of batteries properly (see your local
regulations)
Battery Warning
• Do not heat above 75ºC (167ºF) • Do not expose contents to water
• Do not open batteries • Do not dispose of in fire
• Do not install backwards
Setting the Clock
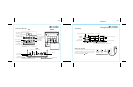
The unit features a Daylight Saving Time (DST) Switch on the back of the unit to quickly add or subtract an
hour to account for Daylight Saving Time and Standard Time differences. Before setting the time, move the
DST Switch to +1 to add an hour or to -1 to subtract an hour.
1. Press and hold the Clock Button for 2 seconds until the clock display flashes and a beep sounds.
2. Press the – or + Buttons to adjust the clock to the current time (hold for rapid setting).
Make sure you set the correct AM/PM time. The AM and PM indicators appear to the left of the display.
3. To toggle the clock display between standard 12 hour time and 24 hour (“military”) time display,
press the Button during time setting while time digits are flashing.
4. Press the Clock Button to confirm the time and exit clock setting mode. 2 beeps will confirm clock setting
is complete.
FM Radio
1. Press and release the Mode Button as needed until the FM indicator icon and current FM radio station
appear on the display.
2. Press the – or + Buttons to tune the radio to the desired station (hold to scan for the next clear station).
Extend the FM antenna for best reception.
3. Press the or Buttons to adjust the volume on the unit.
4. When you are through listening, press the Button to turn the unit off.
Using the iBN180
8
P9
3/04/2014