


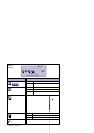


PREPARING THE REMOTE CONTROL
CAUTION
Do not use any other batteries other than those specified in this manual for the Remote Control. Do not insert old and new
batteries together in the Remote Control. Make sure that the terminals match the “+” and “–” indications in the battery
compartment. Burst batteries or the electrolyte from these batteries may cause stains, fire or injury.
n
NOTE
Replace with new batteries when the Remote Control does not work close to the monitor. Use AA dry batteries.
Operate the Remote Control by pointing it toward the Remote Sensor on the monitor.
Other manufacturers remote control will not work with this monitor. Use the provided Remote Control ONLY.
n
n
n
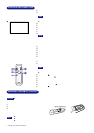
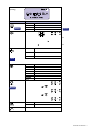
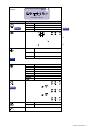
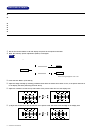
A
Input Button (INPUT)
B
Auto Button (AUTO)
Adjusts Clock, Phase, H-Position and V-Position automatically.
nFor best results, use the Auto Set-up in conjunction with the test pattern Test.bmp.
(See page 12 for SCREEN ADJUSTMENTS.)
nThe screen becomes dark for approximately five seconds during the adjustment.
C
Zoom + Button ( )
D
– Button / Contrast Button ( )
E
Exit Button (EXIT)
F
Power Switch (POWER)
G
Menu Button (MENU)
H
+ Button / Brightness Button ( )
I Zoom – Button ( )
NOTE
<Remote Control>
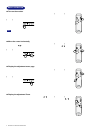
To use the remote control, insert the two dry batteries.
A
Slide open the battery case lid on the reverse of the remote control as shown in the illustration.
B
Take care not to mix up the “+” and “–” terminals.
C
Slide closed the battery case lid.
4 BEFORE YOU OPERATE THE MONITOR
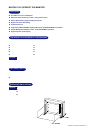
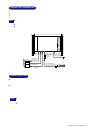
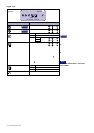
CONTROLS AND CONNECTORS
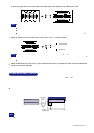
A
Power Switch (POWER)
B
Auto Button (AUTO)
Adjusts Clock, Phase, H-Position and V-Position automatically.
n For best results, use the Auto Set-up in conjunction with the test pattern Test.bmp.
(See page 12 for SCREEN ADJUSTMENTS.)
n The screen becomes dark for approximately five seconds during the adjustment.
C
– / Contrast Button ( – / )
D
+ / Brightness Button ( + / )
E
Menu Button (MENU)
F
Input Button (INPUT)
G
Remote Sensor
H Power Indicator
Blue: Normal operation
Orange:Power Management
The monitor enters into power management mode which reduces the
power consumption to less than 5W when receiving no horizontal and/or
vertical sync signal.
I
Optional Video Adapter Slot
J
DVI-D 24pin Connector (DVI)
K
D-SUB mini 15pin Connector (D-SUB)
L
RS-232C Connector (RS-232C)
M
AC Connector (AC IN)
N
Main Power Switch (POWER)
<Back>
NOTE
NOTE