


4
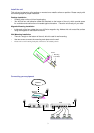
1. Connecting the Ethernet cable.
Connect a network cable to the Internet Sharing Station’s RJ-45 or BNC port. This unit supports
two types of Ethernet cables: Thin Ethernet (10BASE2, BNC connector) and Twisted Pair
Ethernet (10BASE-T, RJ-45 connector). During power up, the unit automatically detects the type
of network cable and adjusts to that environment.
Note: Please do NOT use both of BNC and RJ-45 connections simultaneously.
2. Connect your modem.
Connect an external modem or ISDN TA, using a standard serial cable, to the WAN port on the
back of the unit and to a phone line
Notes:
z Turn off the power before connecting or disconnecting modems.
z You can connect up to two modems to the Internet Sharing Station
3. Connect the power adapter.
Connect the power adapter to the units. The Power LED should light.
4. Connect the Internet Sharing Station and all of your PCs to hub
Before proceeding this step, make sure each of your PCs has a network interface card installed.
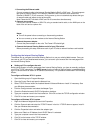
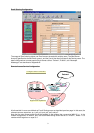
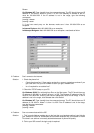
Configuring the Internet Sharing Station
The easiest way to configure the Internet Sharing Station is to use your existing Web browser. Once you
have set up your PC and installed web browser, you can launch your browser and view web pages from
the Internet Sharing Station.
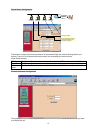
Setting up PC to configure the web
Before using browser to find the web pages from Internet Sharing Station, you have to manually configure
your PC for TCP/IP networking. The DHCP server function of Internet Sharing Station is enabled defaultly,
your PCs should be set to obtain an IP address automatically. This procedure is described in the following
section.
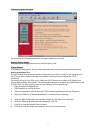
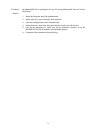
To configure a Windows NT 3.51 system
1. Open the Main group in Program Manager.
2. Open the Control Panel and open the Network icon.
3. Select TCP/IP Protocol within the Installed Network Software Window or install it if necessary. See
your Windows documentation.
4. Click the Configure button and select the Adapter Type.
5. Check the Enable Automatic DHCP Configuration checkbox.
6. Type your computer name in the Host name box. Click OK to close the TCP/IP configuration window.
7. Click OK to close and restart your computer.
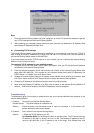
To configure a Windows NT 4.0 system
1. Right-click Network Neighborhood and click Properties.
2. Click the Protocols tab and select the TCP/IP Protocol in the list. If TCP/IP does not appear, install it.
See your Windows documentation.
3. Click the Properties button and select the adapter type.
4. Make sure “Obtain an IP Address from A DHCP Server” is selected.
5. Type your computer name in the Host name box.
6. Click OK on the bottom of the TCP/IP window.
7. Click OK to close and restart your computer.