


8
Using the Drive
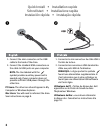
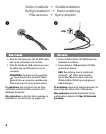
Disconnecting the Drive
CAUTION! To prevent data loss, do not disconnect the drive during data transfer (activity light
flashing).
PC Users: Use the Safely Remove Hardware icon in the Windows taskbar before disconnecting.
Mac Users: Drag the disk icon to the Trash (Eject) icon on the Mac Desktop.
Backing Up with Your Drive
Iomega recommends periodic system backups and more frequent data backups to ensure that
your critical data is always protected. The frequency of your backup should depend on the
importance of your data. To protect your data, you can simply drag and drop copies of your critical
files onto the drive.
CAUTION! Any data storage device can fail. Always keep at least two copies on different disks for
all critical data files.
Formatting the Drive for Mac OS
The drive ships formatted NTFS. Use Disk Utility to reformat the drive Mac OS Extended Journaled.
NOTE: The following instructions work for Mac OS X, version 10.4 or above. For Mac OS X version
10.1 through 10.3.9, use Disk Utility, Erase to format the drive. See Mac Help if you need more
detailed instructions.
1. Select Applications → Utilities → Disk Utility
2. In the left hand column, click on the drive icon for the Iomega Hard Drive. Make sure you click
on the orange drive icon, not the volume icon.
3. Select the Partition tab.
4. Change Volume Scheme from Current to 1 Partition.
5. Select Mac OS Extended (Journaled) from the Format drop-down menu.
6. Click on the Options button.
7. Select the type of partition needed for your Mac:
GUID Partition Table for bootability on an Intel-based Macintosh computer.
Apple Partition Map for a PowerPC-based Mac.
8. Click OK.
9. Click the Partition button. The drive is ready to use when the format completes.