


4
Quick Install • Installation rapide
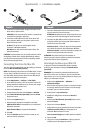
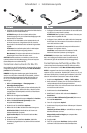
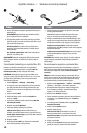
ᕡ ᕢ
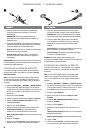
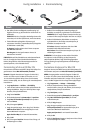
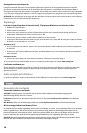
1. Connect the included power supply to the back of the
drive and to a power outlet.
CAUTION! Do not move the drive while it is powered up
to avoid drive damage or data loss.
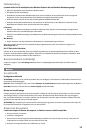
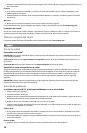
2. Connect the USB cable to the back of the drive and
your computer. Make sure the power switch on the
back of the drive is ON.
PC Users: The drive icon should appear in My
Computer or Windows Explorer.
Mac Users: You will need to reformat the drive. See
instructions below.
CAUTION! To prevent data loss, do not disconnect the drive
during data transfer (drive activity light flashing). Always
use the safe removal procedure for your operating system
when disconnecting the drive.
Formatting the Drive for Mac OS
The drive ships formatted NTFS. Use Disk Utility to reformat
the drive Mac OS Extended Journaled.
NOTE: The following instructions work for Mac OS X, version
10.4 or above. For Mac OS X version 10.1 through 10.3.9,
use Disk Utility, Erase to format the drive. See Mac Help if
you need more detailed instructions.
1. Select Applications → Utilities → Disk Utility
2. In the left hand column, click on the drive icon for the
Iomega Hard Drive. Make sure you click on the orange
drive icon, not the volume icon.
3. Select the Partition tab.
4. Change Volume Scheme from Current to 1 Partition.
5. Select Mac OS Extended (Journaled) from the Format
drop-down menu.
6. Click on the Options button.
7. Select the type of partition needed for your Mac:
GUID Partition Table for bootability on an Intel-based
Macintosh computer.
Apple Partition Map for a PowerPC-based Mac.
8. Click OK.
9. Click the Partition button. The drive is ready to use
when the format completes.
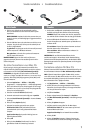
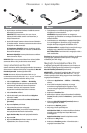
1. Connectez l’alimentation fournie à l’arrière du disque,
puis connectez-la à une prise secteur.
ATTENTION ! Ne déplacez pas le disque lorsqu’il est sous
tension pour éviter tout dommage ou perte de données.
2. Connectez le câble USB à l’arrière du lecteur et à votre
ordinateur. Vérifiez que l’interrupteur d’alimentation à
l’arrière du lecteur est sur ON.
Utilisateurs de PC : l’icône du disque dur doit apparaître
sur le Poste de travail ou dans l’Explorateur Windows.
Utilisateurs de Mac : vous devez reformater le disque dur.
Reportez-vous aux instructions ci-dessous.
ATTENTION ! Pour éviter toute perte de données, ne
déconnectez pas le lecteur pendant un transfert de données
(voyant d’activité du lecteur clignotant).
Formatage du disque pour Mac OS
Le disque dur est livré formaté NTFS. Utilisez l’utilitaire
de disque pour reformater le disque dur Mac OS étendu
(journalisé).
REMARQUE : les instructions suivantes fonctionnent pour
Mac OS X, version 10.4 ou ultérieure. Pour les versions Mac
OS X versions 10.1 à 10.3.9, utilisez Utilitaire de disque, puis
Effacer pour reformater le disque.
1. Sélectionnez Applications → Utilitaires →
Utilitaire de disque
2. Dans la colonne de gauche, cliquez sur l’icône du disque
dur Iomega. Assurez-vous de cliquer sur l’icône orange
du disque, pas sur l’icône de volume.
3. Sélectionnez l’onglet Partitionner.
4. Modifiez la configuration de volume de Actuel à 1
Partition.
5. Sélectionnez Mac OS étendu (journalisé) dans le menu
déroulant Format.
6. Cliquez sur le bouton Options.
7. Sélectionnez le type de partition requise pour votre Mac :
Tableau de partition GUID pour l’amorçage sur un
ordinateur Macintosh basé sur Intel.
Carte de partition Apple pour un Mac basé sur PowerPC.
8. Cliquez sur OK.
9. Cliquez sur le bouton Partitionner. Le disque peut être
utilisé dès que le formatage est terminé.