


8
PRESENTATION
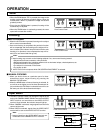
1. Presentation of Printed and Three-
Dimensional Materials
2
Slide film holder
Stage
3
Adjust the direction to
make the stage the
brightest
TELE
WIDE
CAMERA
VIDEO
INPUT SELECT
FOCUS
ZOOM
AUTOMANUAL
FAR
NEAR
1
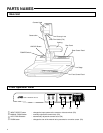
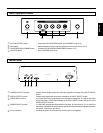
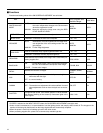
Front Control Panel
ON-SCREEN ADJUSTMENT
MENU/ENTER LIGHTING
AUTO WHITE
SET
IRIS
Rear Control Panel
LIGHTING button
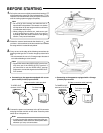
3. Filming peripheral subjects
• Place a subject on the stage, and adjust the subject size
using the ZOOM button
1
by looking at the monitor
screen. (Focusing will be adjusted automatically.)
* When using the equipment indoors, we recommend the use
of lighting (see page 10 for lighting)
Note:
• The LIGHTING section will be hot while in use or im-
mediately afterwards. Be careful not to touch it be-
cause it could cause burns.
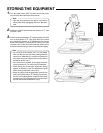
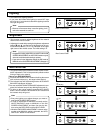
2. Presentation of Slide Films
1.
Switch on lighting, insert a slide into the slide film holder
2
and adjust the image size with the ZOOM button.
2.
Adjust the direction of lighting so that the stage will be at its
brightest
3
.
3.
Use the ZOOM at the WIDE setting. When the slide is a
portrait, if you magnify it until the slide’s frame is not visible,
the image will be out of focus.
Note:
• Reflective light from the stage is used in this opera-
tion. Do not place any other materials on the stage.
• Depending on the slide, the image may become darker
or acquire grittiness. In these cases, use a commer-
cially available light box.
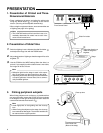
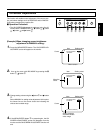
When filming subjects such as faces or a blackboard that
are not on the stage, remove the CLOSE-UP lens as shown
in the diagram on the right of this page and then rotate the
camera head towards the direction of
4
.
Note:
• Avoid fingerprints or dust getting onto the close-up
lens.
• When filming the subjects on the stage, the close-up
lens needs to be fitted again. The camera head should
be returned to the original position.
4
Close-up lens
Rear Panel side
(Back of the body)