


Operation
Using the Projector
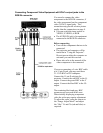
1) Connect the supplied power cable to the projector, then to the wall outlet (the mains). The
POWER indicator on top of the unit lights in amber.
2) Press the POWER ON button on the remote control or the POWER button on top of
the unit to turn on the unit.
The POWER indicator on top of the unit turns to green and start blinking. It will take about
one minute for the projector to be ready to use. Wait until the indicator stops blinking and
lights steadily in green.
Note: While the POWER indicator is blinking, the unit doesn't turn off even if you press the
POWER OFF button on the remote control or the POWER button on the unit.
3) Turn on the connected source (computer, VCR, DVD player, etc.).
If you use a video component, start playback for screen/image adjustment.
4) Press VIDEO or RGB to select the input source.
You can also select the input source with the menu operation.
Notes
• If the blue, black or focus pattern screen (the background type differs depending on the
"BACKGROUND" setting.) is projected, check the following:
- Is the source is properly connected to the unit?
- Is the source component or computer turned on?
- Is the video signals are coming to the projector?
• The video resolution of the connected computer can be changed.
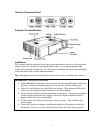
5) Adjust the position and height of the unit.
Move the unit to the position where the projected image is horizontally centered to the screen.
The internal keystone adjustment can adjust for some horizontal problems, but the best image
is obtained when the projector is optimality positioned.
• When the projected image is offset horizontally
Adjust the position of the unit so that the unit is square to the screen
• When the projected image is offset vertically
Adjust the height balance of the unit with the adjusters.
Using the adjusters to adjust the height balance
There are two adjusters one on the front and one on the side.
To lower the position of the screen, pull out the folded leg of the rear adjuster.
For the side adjuster, rotate the adjuster until the unit is horizontally parallel to the screen.
6) Adjust the focus with the focus ring and if required use the keystone adjustment to
parallel the side of the image with the screen.
7) Change the unit setting to suit to the projecting method and selected source as described
in step 4.
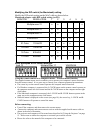
• Select the type of projection
If the projected image is horizontally reversed or upside down, change the projection type.
See page 16.
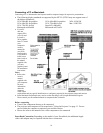
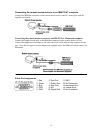
• If the component video signal output jacks of the video component are connected to the
RGB IN connector, set the RGB input to YCbCr" in the menu.
This setting can provide a better picture image.
13