


1-LINE
2-EXT
EN
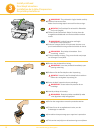
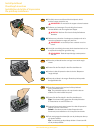
Connect fax line
Fax-Leitung anschließen
Connexion de la ligne 0de télécopie
De netvoeding aansluiten
7
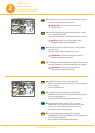
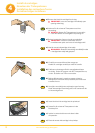
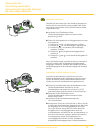
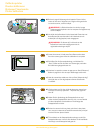
SEPARATE FAX LINE:
Connect your printer to the phone line as shown in the illustration
if you have a separate fax line on which you receive no voice calls
and you have no other equipment connected on this phone line.
a) Connect a phone cord to your telephone wall jack and the
port labelled 1-LINE.
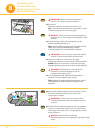
b) Set your Rings to Answer setting by following the steps below.
1) Press Menu to display the main menu.
2) Press until Fax Settings is displayed.
3) Press OK to display the Adjust Fax Settings menu.
4) Press until Rings to Answer is selected.
5) Press or to change the number of rings.
When the phone rings, your printer will answer automatically
after the number of rings you set in the Rings to Answer setting.
It will then send fax reception tones to the sending fax machine
and receive the fax.
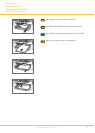
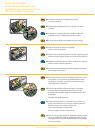
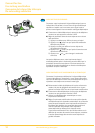
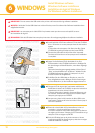
SHARED LINE WITH ANSWERING MACHINE:
Connect your Kodak AiO printer to the phone line as shown in
the illustration if you receive both voice calls and fax calls at the
same phone number with an answering machine.
a) Disconnect the phone cord from the wall jack that connects
your modem to the telephone wall jack and plug it into the
port labelled 2-EXT on your All-in-One.
b) Connect the phone cord to your telephone wall jack and the
port labelled 1-LINE.
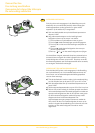
c) Set Answering Machine Mode on your All-in-One to ON.
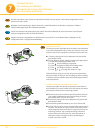
d) Set your AiO printer to answer the phone after the answering
machine. The number of rings to answer for the AiO printer
should be greater than the number of rings to answer for the
answering machine. You want the answering machine to
answer before your AiO printer. For more information on
setting the number of rings to answer, see Set Rings to
Answer in the User’s Guide.
FR
FR
FR
NL
EN
DE
Use the instructions in this section to connect the fax feature of your printer. More setup configurations can be
found in the User’s Guide.
Beachten Sie die Anweisung in diesem Abschnitt, um die Faxfunktion Ihres Druckers zu aktivieren. Weitere
Setup-Einstellungen finden Sie im Benutzerhandbuch.
Suivez les instructions de cette section pour utiliser la fonction télécopie de votre imprimante. Vous trouverez
d'autres configurations dans le Guide d'utilisation.
Volg de instructies in dit gedeelte om de faxfunctie van uw printer in te schakelen. Meer instellingen van de
configuratie vindt u in de gebruikershandleiding.
12
www.kodak.com/go/aiosupport
1-LINE
2-EXT