


VP-501N - Connecting the VP-501N UXGA Scan Converter
7
7
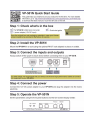
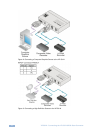
4 Connecting the VP-501N UXGA Scan
Converter
Always switch OFF the power on each device before connecting it to
your VP-501N. After connecting your VP-501N, connect its power and
then switch on the power on each device.
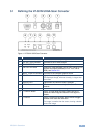
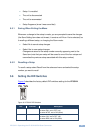
To connect the VP-501N, as the example in Figure 2 shows, do the following:
1. Connect a computer graphics source to the 15-pin HD INPUT connector (for
example, a PC as shown in Figure 2), or alternatively, connect a high
definition source to the 15-pin HD INPUT connector (for example, a set top
box as shown in Figure 3).
To connect a high definition source, use a breakout cable such as the Kramer
C-GM/3RVF. If you have a VGA to a 5BNC cable, use the RGB wires only.
2. Connect the Y/C OUT 4-pin connector to the Y/C acceptor (for example, an
s-Video recorder) and/or the CV OUT BNC connector to the CV acceptor (for
example, a composite video recorder).
3. Set the DIP-switches (see Section 5.6).
4. Connect the 12V DC power adapter to the power socket and connect the
adapter to the mains electricity.
5. Adjust the scan converter features if required (see Section 5.2).
i