KRAMER ELECTRONICS LTD.
11
6.
INSTALLATION
6.1 Rackmounting
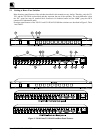
Each of the amplifiers included in this manual may be rackmounted in a standard 19” (1U) EIA rack assembly
and includes rack “ ears” at the ends of the front panel. (The optional VS-2000 controller requires 2U of rack
height, at 3.5".) These devices do not require any specific spacing above or below the unit for ventilation. To
rack mount any of the switchers, simply place the unit’s rack ears against the rack rails of the rack, and insert
standard screws through each of the four corner holes in the rack ears.
7.
CONNECTING TO VIDEO DEVICES
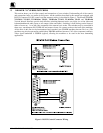
Video sources and output devices (such as monitors, projectors or recorders) may be connected to the switchers
through the BNC type connectors located on the back of the unit. Please keep in mind that the input signal
format must match that of the output signal format. (Example: If input is Composite video, then output is
Composite video.) All signal connections that use more than one cable interconnecting between devices should
be of equal length. (Example: R, G, B cables between a camera and the switcher should be equal in length).
NOTE
The switchers described in this manual are very similar. The connections of the VS-1211 and the VS-1201xl
are described and may be applied accordingly to the others.
7.1 Connecting To the VS-1211/1201xl/1001xlm
Video sources and output devices connected to the VS-1211/1201xl/1001xlm models support composite/single
component video signal types, via BNC connectors.
8.
CONNECTING TO AUDIO DEVICES
8.1 Connecting To the VS-1211
Audio sources and output devices (such as amplifiers or recorders) may be connected to the VS-1211 switcher
through the snap fit terminal blocks located on the back of the unit.
8.2 Connecting To the VS-1201xl/1001xlm
Audio sources and output devices (such as amplifiers or recorders) may be connected to the VS-1201xl switcher
through the RCA type connectors located on the back of the unit.
9.
DIP SWITCHES, JUMPERS AND TRIMMERS
Consider the VS-1211 as an example of all the switchers in the family. It switches video and balanced stereo
audio simultaneously. As mentioned previously, there are three options for operating the switcher. All are
available without removing the switcher cover.
It can be operated by touching one of the front panel switches.
It can be operated by a remote PC via the RS-232 or RS-485/422 connectors on its rear panel.
It can be operated using the contact closure option.
9.1 DIP Switches
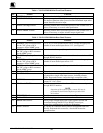
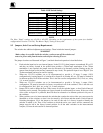
The DIP switch (see Table 3) on the rear panel should be set when the switcher is operated via the RS-232 or
RS-485/422 connector, or when it is interconnected with other switchers. These switches allow proper
configuration of the control signals received and transmitted through the RS-232 control port. Each of the “ VS”
switchers allows master/slave configurations. This allows the switchers to operate independently, or in
conjunction with each other.


