


7
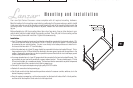
Mounting and installation
Your new Opti Series Crossover comes complete with all required mounting hardware.
Mark the location for the mounting screw holes by positioning the Crossover where you wish to install
it and use a scribe (or one of the mounting screws) inserted in each of the mounting holes to mark the
mounting surface. If the mounting surface is carpeted, measure the hole centers and mark with a felt
tip pen.
Before attempting to drill the mounting holes, take note of any wires, lines or other devices in your
vehicle which may be located behind the mounting surface! Then drill pilot in the mounting surface
for the mounting screws and insert then. Tighten the screws securely.
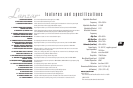
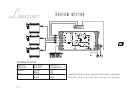
• A red 18 gauge stranded or heavier and insulated wire should be connected to the terminal marked +12V.
Wire an in-line fuse holder on this lead as it is the 12 Volts DC wire for the system. This wire should
be connected to your vehicle’s battery. If a wire is run directly to the battery make sure to install an in-
line fuse on this wire within 12” from the battery.
• A black stranded wire of at least 18 gauge should be connected to the terminal marked Ground. This is
the ground wire for the X-3B and should be attached to the same ground point with the amplifiers in the
system. Keeping this ground wire as short as possible improves the electrical circuit and keeps ground
related noise problems to a minimum.
• An orange stranded wire of a least 20 gauge should be connected to the terminal marked Remote. This
wire connects to your head unit’s remote out or power antenna lead out. This wire should supply 12 Volts
DC any time the radio, cd or cassette are playing. This lead must also be connected to any other components
in your system that utilize a remote turn-on lead for powering up.
• Connect all line inputs and outputs using high-quality RCA-RCA cables.
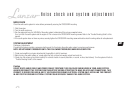
• Recheck all connections before powering up.
• Set all level controls to their least sensitive positions and set all crossover controls, switches, etc. to the
desired frequency or position.
• Once the system is powered up, set the volume control on the head unit to about the 2 o'clock position,
and then set all the amplifiers' level controls for half output level.
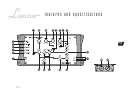
Installation
from either, the mix of from front inputs, the direct from rear inputs.
REAR OFF