


1200 Series User’s Manual
4
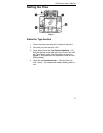
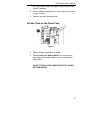
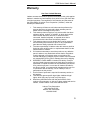
Set the Time on the Type Wheels
Figure 2
1. Locate the Center Line where all the wheels line up as
shown in Figure 2.
2. Rotate the wheels using a pointed object. Rotate each
wheel until the correct date and time are aligned at the
Center Position, as shown in Figure 2. Hint: Start at
the top wheel and work down when setting.
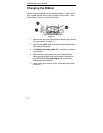
Note: if your machine records in 1-12 hours, the PM hours are
underlined. AM hours are not underlined. Set time to the proper
hour of the day to avoid errors such as setting the day wheel to
the next day at noon rather than midnight.
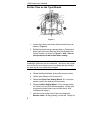
3. Rotate the Minute Wheels to show the current minute.
4. Set the Hour Wheel to the current hour
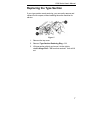
5. Rotate the Clock Face Setting Wheel– 3.1 to set the
hands to match the time set on the wheels.
6. Rotate the Main Setting Wheel – 2.1 to advance both
the Clock Face and Print Wheels together. Rotate until
you pass the actual time by one minute (each “click”
indicates one minute.)
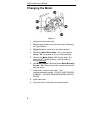
7. Hold the corner of the Clock Face and release the
Release Latch – 2.2 by pushing it to the left. Slowly let